15 Best Tunic Sewing Ideas You Need To Try!
I’ve been sewing tunics for years, and I can tell you they’re one of the most rewarding projects you’ll tackle. They’re forgiving enough for beginners yet versatile enough to keep experienced sewists engaged. Whether you’re working with flowing rayon or crisp linen, there’s a style that’ll match your skill level and wardrobe needs. I’ve gathered my favorite patterns that range from simple straight-cuts to more intricate designs with embellishments, so let me walk you through each one.
Key Takeaways
- Classic A-line tunics with Mandarin collars use lightweight linen and fusible interfacing for crisp necklines and summer comfort.
- Bohemian tunics feature rayon challis fabric, cross-tied necklines with beads, raglan sleeves, and flowing high-low hems for relaxed style.
- Structured box-pleat tunics employ precise marking, pressing techniques, and stiffer fabrics to maintain architectural lines and professional finishes.
- Beginner-friendly designs include flat-sleeve construction, French seams, V-necks, and rectangular sleeves with dropped shoulders for easy assembly.
- Modern styling adds asymmetric curves, side slits, digital prints on peachskin fabric, and waist belts for contemporary flattering silhouettes.
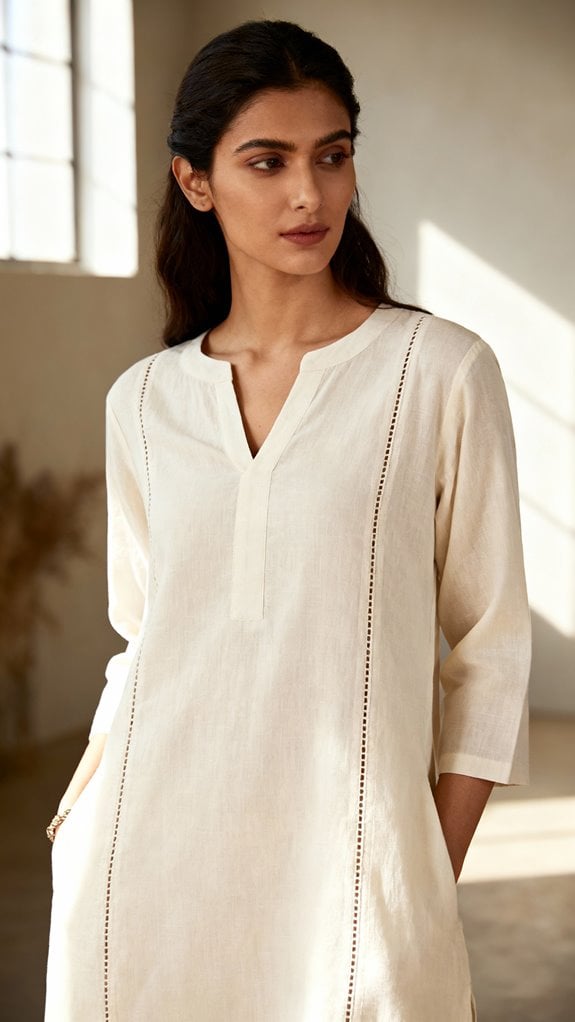
Classic A-Line Linen Tunic With Mandarin Collar

I’ve sewn dozens of tunics over the years, but the classic A-line linen tunic with a Mandarin collar remains my go-to pattern whenever I need something that works equally well for a summer market run or a casual dinner out. The silhouette flatters multiple body types while the stand-up collar adds unexpected elegance.
I always prewash my medium-weight linen and use fusible interfacing on the collar—it’s essential for maintaining that crisp neckline. When drafting the Mandarin collar, I measure my neckline precisely and draw a curved rectangle, making the under-collar slightly smaller with notches for easy assembly. After marking the center back, I divide into three sections and cut lines from top to bottom to create the proper curved shape. Lightweight fabrics are also recommended for this style to ensure breathability and comfort.
The construction is straightforward: stitch shoulders, attach the interfaced collar, add button bands, then sleeves. I love customizing with contrast buttons or color blocking to modernize the classic design.
Breezy Rayon Challis Bohemian Tunic With Cross-Tied Neckline

When I discovered rayon challis a few years back, it completely changed how I approached bohemian-style tunics. This fabric’s silky drape creates that effortless flowing look I always wanted, and it breathes beautifully in warm weather. Using sustainable sewing techniques can enhance the overall appeal of your tunic.
For construction, I always pre-wash first—rayon challis can shrink up to 20%. I use a sharp 10/70 needle and pattern weights since this fabric slides around. The cross-tied neckline becomes my signature detail; I thread ties through small casings and add wooden beads for bohemian flair.
I pair mine with loose raglan sleeves and a high-low hem to maximize the gorgeous drape. After finishing seams with my serger, I’ve got a versatile tunic that works with leggings or shorts, perfect for festivals or casual days. Before hemming, I hang the nearly finished tunic for 24 hours to allow the fabric to settle and prevent any shifting that could throw off the hem length.
Everyday Cotton Lawn Straight-Cut Tunic With V-Neckline
Cotton lawn has become my go-to fabric for straight-cut tunics I actually wear every single day. Its fine weave keeps me cool in warm weather while maintaining enough structure for those clean, straight lines I love. Additionally, using cotton lawn allows for easy beginner-friendly sewing projects that can help enhance your skills.
I’ve learned that French seams are essential with this delicate fabric—they prevent fraying beautifully. I always use an 11/75 needle and staystitching around the V-neckline before anything else to prevent stretching.
The V-neck design flatters every body type and makes dressing effortless—no complicated closures needed. I simply understitching the facing so it lies completely flat against the lightweight fabric. For the sleeves, I find that raglan sleeve construction works up quickly and creates a comfortable fit without complicated set-in sleeve techniques.
What I appreciate most is how beginner-friendly this project is. The straight-cut pattern requires minimal pieces, and cotton lawn’s stability makes cutting and sewing straightforward. I pair mine with leggings or slim trousers for versatile everyday outfits.
Elegant High-Low Hem Tunic in Polyester Peachskin
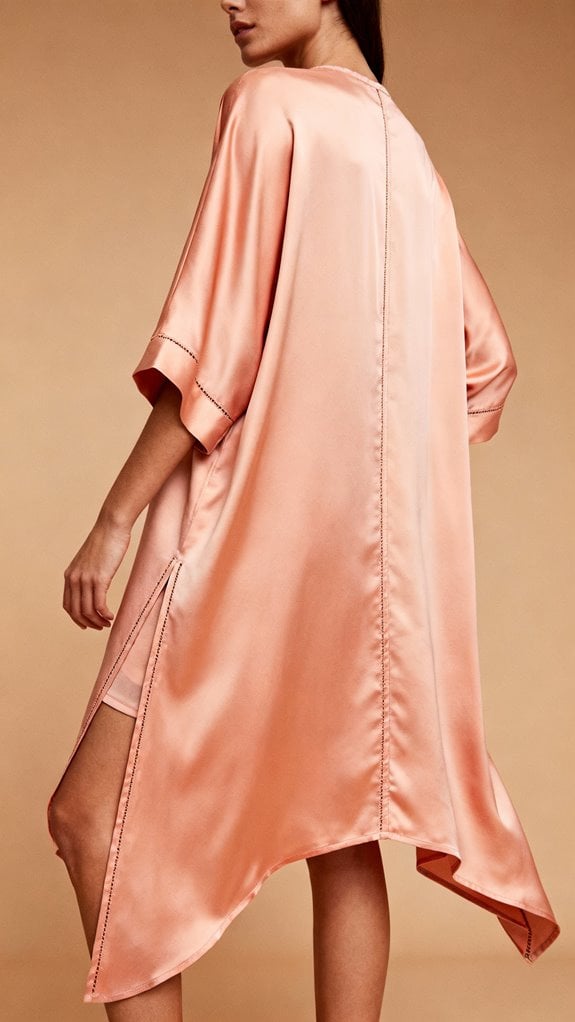
Polyester peachskin transforms the high-low hem tunic into something truly special—that soft, suede-like texture drapes beautifully while maintaining structure through the asymmetrical hemline. I’ve learned that using pattern weights and fabric clips prevents shifting during cutting, which otherwise frustrates the entire process.
When sewing, I switch to microtex needles and loosen my thread tension to avoid puckering. The fabric’s moisture-wicking properties make it surprisingly practical for daily wear, not just special occasions. I particularly love how digital prints appear vibrant on peachskin’s smooth surface. Additionally, this fabric is a popular choice for many seasonal projects due to its versatility.
For construction, I stretch the fabric slightly while sewing and finish seams with a zigzag stitch. The lightweight fabric’s excellent drape ensures the high-low hem falls gracefully without adding bulk. The result? A flowing, elegant tunic that’s machine washable and resists wrinkles—perfect for layering over leggings when temperatures drop.
Relaxed Drop-Shoulder Chambray Tunic for Casual Wear

While polyester peachskin offers elegance, I find myself reaching for chambray tunics most mornings—they’re the workhorses of my handmade wardrobe. Creating a drop-shoulder tunic starts with my bodice block. I divide the shoulder seam in half, raise it 1/4 inch, then extend the new shoulder line 3 inches beyond the original. From that edge, I drop a perpendicular line halfway between shoulder and side seam. The side seam drops 1/2 inch to compensate for the smaller armhole.
I extend my pattern 4 inches below the waistline, calculating the bottom width using a quarter of my hip measurement plus 1/2 inch ease. Adding details like pockets can enhance the functionality and style of your tunic. Cotton chambray is ideal for beginners—stable and forgiving during construction while maintaining that relaxed, casual aesthetic I’m after. After cutting, I always iron the fabric first to ensure smooth, wrinkle-free pieces that are easier to handle during assembly.
Tailored Box-Pleat Tunic With Center Front Detail

Last spring, I drafted my first box-pleat tunic after years of avoiding structured details—I’d convinced myself pleats were too fussy for everyday sewing. I was wrong. The secret is accurate marking: I chalked three lines per pleat, folded the outer lines to meet at center, then pressed hard with a hot iron. That pressing step locks everything before you stitch. I added a contrasting placket down the center front, which gave the tunic bespoke character without extra complexity. For fabric, I chose medium-weight linen—it holds crisp lines beautifully. My pleat widths measured 1.5 inches, creating balanced proportions. The result? A refined silhouette that works for both office wear and dinner outings, proving pleats aren’t fussy—they’re transformative. This tunic style is enhanced by functional details like pockets that add practicality without sacrificing aesthetics. I also added topstitching along the pleats for extra definition and a professional finish.
Simple Pull-On Tunic With Bias-Bound Finishes
When I needed a summer wardrobe refresh on a tight deadline, I turned to the simplest tunic pattern I know: a pull-on style with bias-bound edges. I traced around a favorite non-stretch shirt, eliminated waist shaping entirely, and cut the front and back on fold for a seamless look.
The real game-changer was using bias binding instead of facings at the neckline and armholes. I folded and pressed the tape, stitched it to the raw edges, then turned it inside for a clean finish. No bulk, no fussing with curves. This technique is similar to bias-cutting techniques that enhance the drape and flow of garments.
I pressed seam allowances at 1 cm, joined the side seams, and hemmed with a double 2 cm fold. The whole project took an afternoon, and I prewashed my lightweight cotton to prevent any surprises later. For styling, I paired it with skinny jeans to maintain the right proportion and create a flattering silhouette.
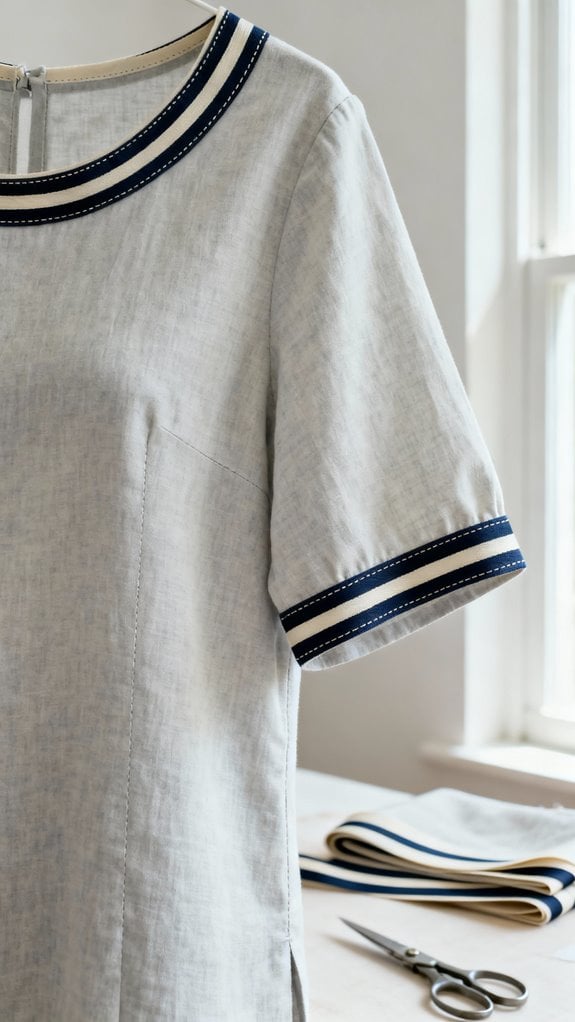
Structured Tunic With Faced Hems and Necklines

Bias binding works beautifully for casual, quick-finish tunics, but when I want something sharp enough for the office or a nice dinner, I reach for a structured pattern with faced hems and necklines. I’ve learned that fabric choice makes or breaks this style—stiffer linens and cottons hold those architectural lines, while drapey fabrics just won’t cooperate. A well-structured tunic can even make use of pleat variations to add visual interest and sophistication.
The technique itself demands precision. I cut facing pieces to mirror the curves, sew them right sides together, then clip and notch the seam allowances religiously. Understitching is my secret weapon—it keeps facings from rolling out and maintains that crisp edge through countless wears. Additionally, I always finish facing edges with an overlock stitch and press thoroughly. These advanced techniques work best with medium weight woven fabrics like the cotton blends and linens recommended for structured tunic patterns. The result? Clean, professional finishes inside and out that elevate any tunic pattern.
Flowy Tunic With Side Seam Vents for Extra Movement
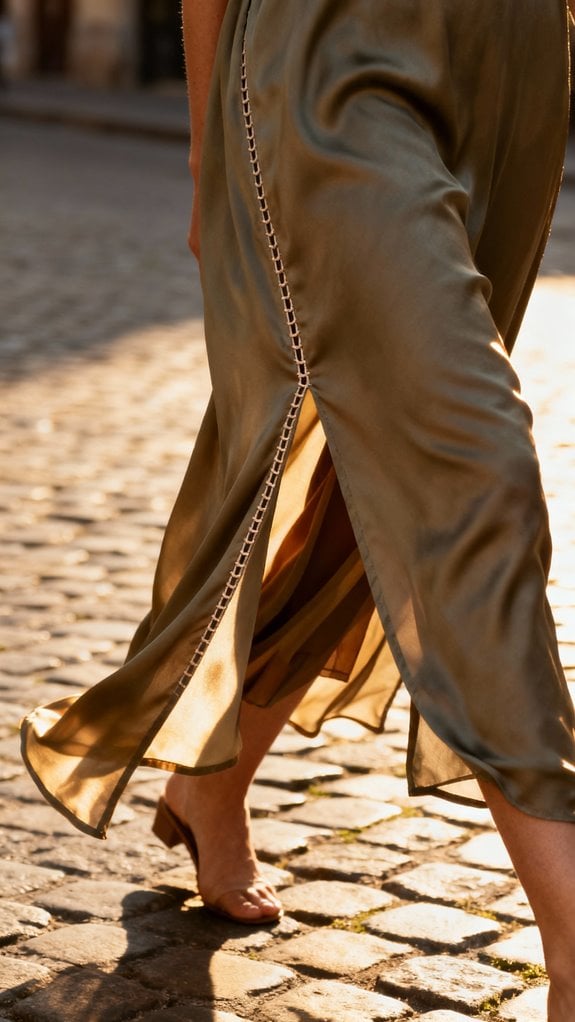
Side seam vents transformed my tunic-sewing game the first time I added them to a basic pattern. I mark dots on both front and back pieces where the vent starts, then add matching seam allowances to that section. Lightweight fabrics like rayon or cotton voile create the best movement.
I sew side seams with a straight stitch—never a serger—stopping at my vent mark. After pressing seams open, I hem the garment first, then fold and press the vent edges under. I use a basting stitch to temporarily close the vent opening at the bottom before continuing up the side seam. Topstitching both sides gives a polished finish.
The length matters: I use 1-2 inches for subtle flair or go 4+ inches for dramatic flow. These vents work beautifully on relaxed-fit tunics, adding ease perfect for layering over leggings.
Beginner-Friendly Flat-Sleeve Construction Tunic

After years of teaching sewing workshops, I’ve watched countless beginners struggle with set-in sleeves, so I now start everyone with flat-sleeve construction instead. This method transforms tunic-making into a confidence-building project.
I always recommend rectangular sleeves with dropped shoulders—no fussy curves to match. First, sew your shoulder seams and press them open. Then align your sleeve center with the armhole center, matching notches as you work outward. Pin carefully, then sew in one continuous seam.
Here’s my game-changer tip: sew the side and sleeve seams together in one long pass after attaching sleeves flat. I tell students to reinforce that underarm intersection with a second stitching line—it prevents splitting during wear. Press seams as you go, and you’ll achieve surprisingly professional results on your first try. Always press your shoulder seams downward after sewing to maintain proper direction when you add the neckline later.
Intermediate Placket Tunic With Button Closure

Once you’ve mastered flat-sleeve tunics, a placket with button closure becomes your next satisfying challenge—and honestly, it’s less intimidating than it looks. I always start by applying interfacing to both curved placket pieces before anything else—this gives them structure and prevents floppy buttonholes later.
The key is transferring every notch and marking from your pattern. Stay stitch around that neckline opening to prevent stretching. When attaching the right and left pieces, remember they’re not identical; the right side shows your buttonhole band while the left conceals the underlap.
I clip curves generously and press obsessively—it’s what makes the difference between homemade and handmade. Note that this tutorial shows a partial placket design that omits the actual buttons and buttonholes for a cleaner, minimalist finish. Topstitching along both edges reinforces everything beautifully while adding professional detail.
Customized Contrast Panel Tunic With Embellishments
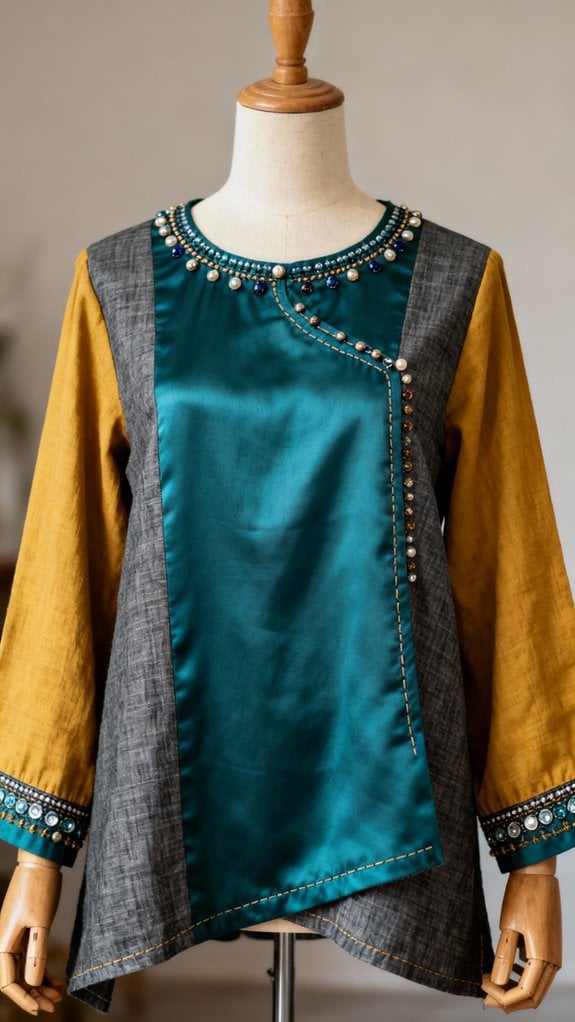
Contrast panels transform a basic tunic into wearable art, and I’ll admit—the first time I inserted a vibrant silk strip down the center of an otherwise plain linen tunic, I felt like I’d discovered a secret level of sewing. The trick is strategic placement: sleeves, side seams, and that bold center panel where quilt blocks or geometric shapes really pop.
I always add half-inch seam allowances and fold fabric before cutting to guarantee symmetrical panels. For bell silhouettes, I curve the hem by adding six to eight inches, matching contrast trim precisely to that edge.
Here’s where it gets fun: embroidered motifs, tablet weave braid, and couched threads along seam lines create maximum impact. Attach trims on the wrong side, iron religiously, and double-check symmetry constantly. Narrow-width textile patterns historically minimized waste by carefully planning each cut, a principle that remains valuable when working with expensive contrast fabrics today. The result? A tunic that looks professionally crafted.
Fitted Yoke Seam Tunic for Enhanced Silhouette

When I first discovered the fitted yoke seam, I realized it’s the difference between a tunic that looks homemade and one that actually flatters. This horizontal seam separates the shoulders from the body, creating structure where you need it while letting the fabric drape beautifully below.
I construct mine using the three-layer assembly method—sandwiching the body between outer and inner yoke pieces. It sounds complicated, but it’s actually straightforward and hides all raw edges. I always press the seam upward and topstitch for that crisp, professional finish. For an even cleaner shoulder assembly, consider the burrito method, which conceals all construction seams between the yoke layers.
Here’s my tip: use stable wovens like cotton or linen, and cut everything on the same grainline. The yoke transforms an ordinary tunic into something genuinely tailored. Test with muslin first—small adjustments make huge differences in fit.
Multi-Size Graded Tunic Pattern for All Body Types

After years of printing patterns only to discover they don’t fit, I’ve learned that multi-size graded patterns are absolute game-changers. Instead of reprinting entire patterns, I simply use Adobe Reader’s layer feature to display only my size—usually blending between sizes for my measurements.
Here’s my process: I always print the test square first to verify my printer scaled correctly at 2˝. Then I trim margins and tape pages together, checking alignment carefully. For those working with standard patterns, remember to add seam allowances as indicated since they aren’t always included.
The real magic happens when I compare my body measurements to the finished garment specs. Sometimes I’ll grade between a size 10 bodice and size 12 hips, redrawing smooth adjustment lines. I pre-wash my fabric before cutting, especially when working with linen or rayon challis, to prevent post-construction surprises.
Modern Curved Hemline Tunic With Unique Flair

A curved hemline completely transforms an ordinary tunic into something special—I discovered this after making my first high-low design and receiving more compliments than any garment I’d sewn before.
The construction requires patience. I run gathering stitches 0.7 cm from the edge, working section by section to prevent puckering. Pre-washing fabric is non-negotiable—I learned this when my linen tunic shrank unevenly after its first wash. Pressing the folded hem creates a crisp, professional finish that elevates the entire garment.
For modern flair, I’ve added asymmetric curves and side slits that create beautiful movement. Lightweight fabrics like cotton voile drape perfectly along curves. I always test my hem technique on scraps first.
My favorite styling trick? Pairing longer curved backs with fitted leggings and adding a waist belt. The silhouette works for any occasion—I’ve worn mine everywhere from coffee runs to dinner parties.
Conclusion
I’ve sewn countless tunics over the years, and I can tell you—each one teaches you something new. My first attempt was a crooked hemline disaster, but I kept going. Now, I’m mixing fabrics and adding embellishments I never thought possible. Start with a simple A-line if you’re nervous, then work your way up. Trust me, once you nail that first tunic, you’ll be hooked. Your wardrobe will thank you!
