22 Amazing Nightmare Before Christmas Crochet You Will Love!
I'll never forget the first time I crocheted a Jack Skellington doll—my niece clutched it for three months straight until the stuffing practically begged for mercy. That's when I discovered the magic of combining Tim Burton's iconic characters with yarn and a hook. If you're looking to create pieces that'll actually get used (and loved to pieces), I've gathered 22 patterns that transformed my craft room into Halloween Town. Here's what worked for me.
Key Takeaways
- Jack Skellington amigurumi features embroidered pinstripes, wire armature limbs for posing, and requires careful skull shaping with safety eyes.
- Sally ragdoll includes patchwork dress with eight yarn colors, loop stitch red hair, and delicate embroidered facial features.
- Zero plushie uses lightweight yarn for translucent appearance, LED tea light nose, and wire-shaped floppy ears with hanging thread.
- Home decor options include character garlands, pillow covers, Christmas stockings, and ornament sets using surface crochet techniques.
- Wearable items feature Jack earflap hats with surface crochet stripes and Sally-inspired patchwork scarves and gloves sets.
Jack Skellington Amigurumi Doll
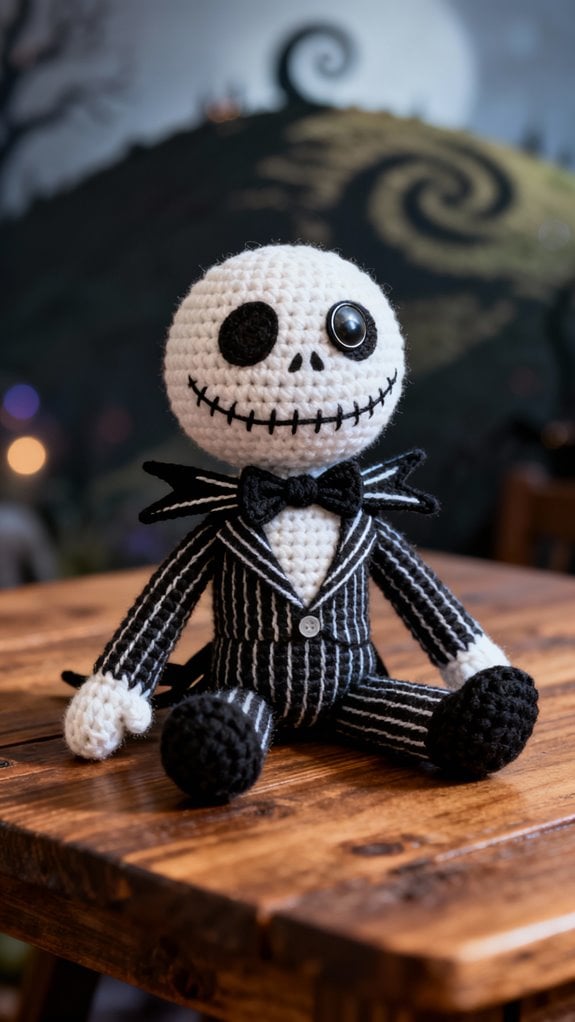
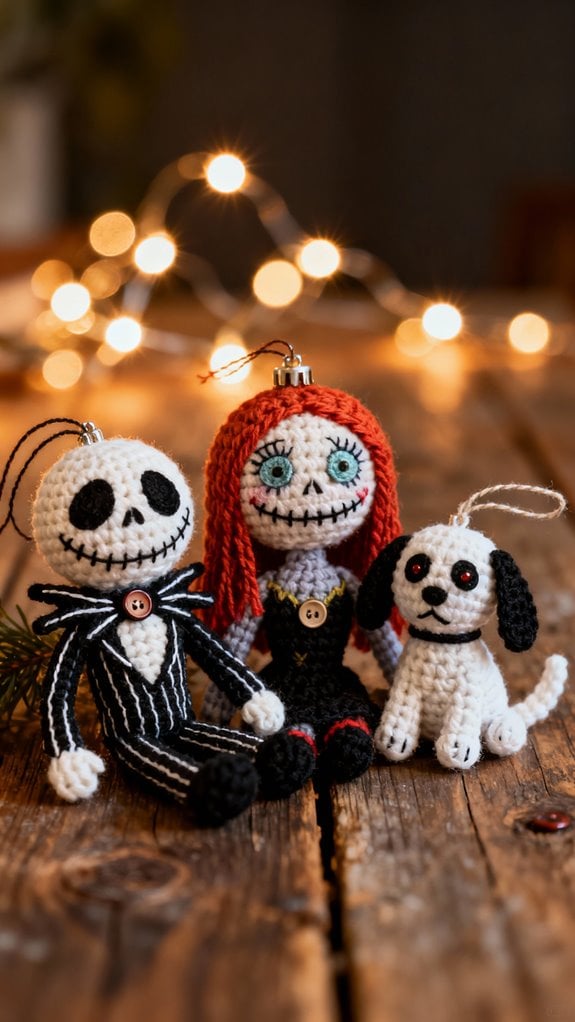
The Pumpkin King himself makes an absolutely perfect amigurumi project, and I can't tell you how many times I've frogged and restarted his iconic pinstripe suit to get those proportions just right. Start with a black body worked in continuous rounds, then embroider white lines for his signature suit. I use a smaller hook than recommended for tight stitches—no stuffing should peek through. His elongated limbs need wire armature for posing; 20-gauge works perfectly. The skull head requires careful shaping at the eye sockets, and I always use safety eyes before closing. His bat bow tie is surprisingly tricky—practice on scrap yarn first. Master his stitched smile with backstitch embroidery, counting precisely to match both sides symmetrically. For an added challenge, consider incorporating amigurumi characters from other beloved series into your crochet projects for a fun twist. Look for this item on Amazon
Sally Ragdoll Crochet Pattern

Creating Sally's patchwork dress remains one of my most ambitious color-work challenges to date, requiring at least eight different yarn colors to capture her iconic stitched-together appearance. I recommend working each patch separately before joining them together, which gives you better control over tension.
For Sally's distinctive red yarn hair, I used a loop stitch technique that created perfect ringlets. Her face proved tricky—I spent three attempts getting her gentle expression just right using embroidery thread for delicate features.
The trickiest part? Those tiny leaf details on her dress. I crocheted miniature appliqués and stitched them strategically across her patchwork fabric. My finished Sally stands twelve inches tall and pairs beautifully with Jack. She's definitely worth the extra effort and yarn investment! Additionally, using soft cotton yarn will ensure comfort against delicate skin in your creations. Look for this item on Amazon
Zero the Ghost Dog Plushie
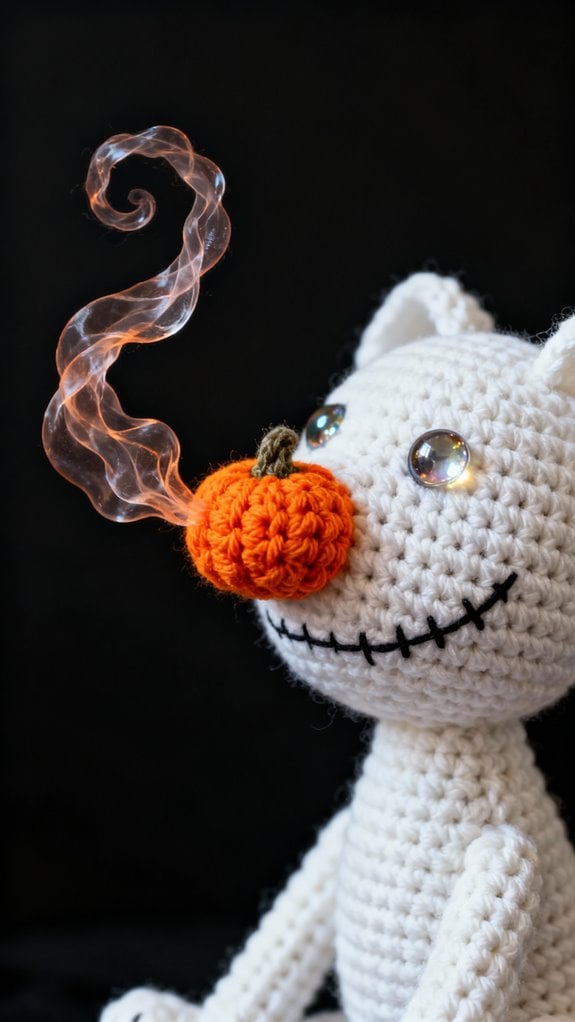
Translucent fabric became my obsession when I decided to tackle Zero, Jack's loyal ghost pup with that glowing jack-o'-lantern nose. I experimented with white yarn combinations until I achieved that ethereal, floating quality. The secret? I used a lighter weight yarn with a larger hook to create an airy texture.
I stuffed LED tea lights inside his nose for that signature glow—game changer! His floppy ears required careful shaping; I inserted wire to maintain their droopy, endearing position. The pattern called for simple stitches, but getting his proportions right took three attempts.
I added fishing line to create an invisible hanging thread, so Zero appears suspended mid-flight. That translucent quality combined with the illuminated nose makes him absolutely magical displayed in my collection. Look for this item on Amazon
Oogie Boogie Amigurumi
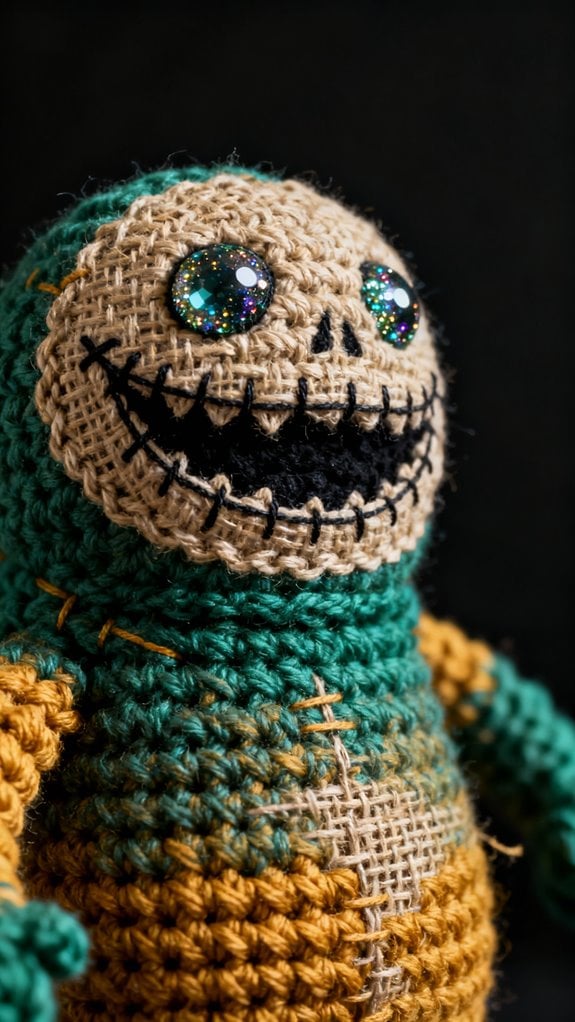
Burlap texture proved to be my biggest challenge when crafting the boogeyman himself. I discovered that using a moss stitch with tan yarn perfectly mimics Oogie's burlap sack appearance. Start with a magic ring for his potato-shaped body, increasing gradually to create that distinctive lumpy silhouette.
For his creepy smile, I embroidered black stitches in an exaggerated curve, adding those menacing eyebrows with sharp angles. The dice pattern on some versions can be sewn on as felt appliqués or crocheted separately as tiny cubes.
Here's my trick: stuff him firmly with fiberfill, but leave the bottom slightly loose so he maintains that slouchy, villainous posture. Add pipe cleaners inside his arms for poseable gestures. He's surprisingly addictive to make once you nail that burlap texture! Look for this item on Amazon
Lock, Shock, and Barrel Trio
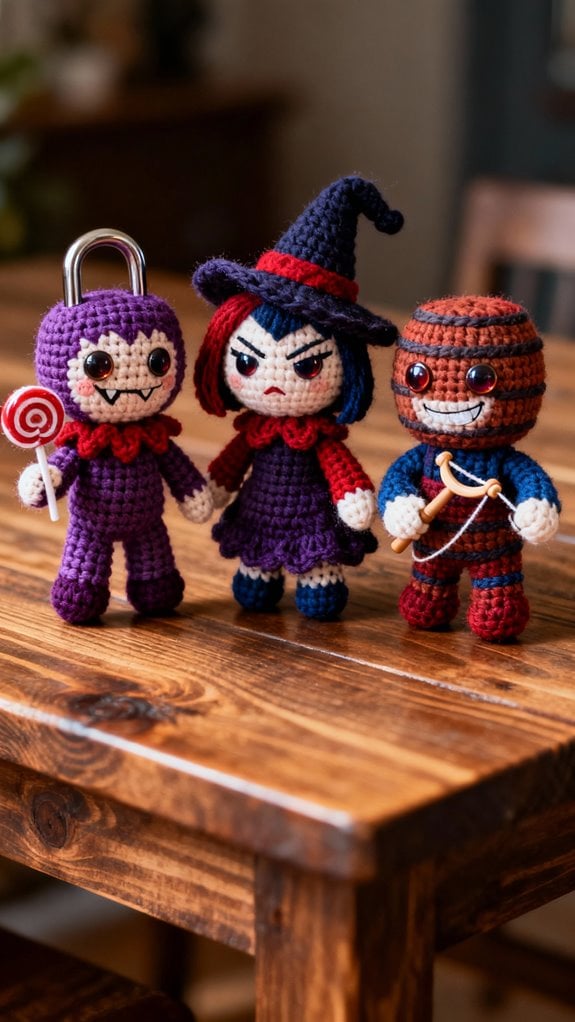
These mischievous trick-or-treaters became my absolute favorite set to crochet as a group project. I crafted each character's signature mask using color-blocking techniques—devil red for Lock, witch purple for Shock, and skeleton white for Barrel.
Start with a basic amigurumi body pattern, then customize each one's costume details. Lock needs tiny horns using red yarn and wire for structure. Shock's witch hat requires stiffening with fabric stiffener to maintain that perfect pointed shape. Barrel's skeleton mask took careful surface crochet to create bone details.
I recommend working all three simultaneously, completing the same sections together. This guarantees consistent sizing and helps you remember pattern modifications. Their wheeled bathtub makes an excellent display base—use sturdy cardboard wrapped in gray yarn with button wheels. Look for this item on Amazon
Jack and Sally Couple Set
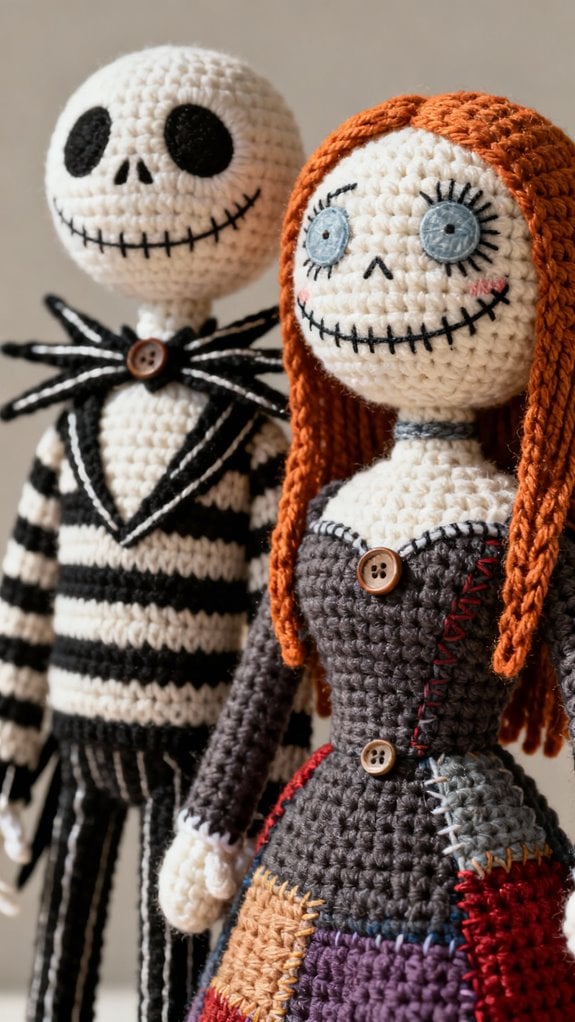
While the troublemaking trio steals scenes with their chaos, the heart of Halloween Town belongs to its most iconic romantic pair. I've crafted dozens of Jack and Sally sets, and they're consistently my most requested pieces. Here's what I've learned: Jack needs long, spindly limbs using wire armature for his signature pose. I create his pinstripe suit with alternating black and white rows. Sally requires careful color blocking—her patchwork dress needs at least five fabric colors. I stuff her lightly to maintain that rag doll appearance. Pro tip: position them holding hands or gazing at each other. The connection between these characters translates beautifully through crochet. They're perfect anniversary gifts for Tim Burton fans who appreciate handmade romance. Look for this item on Amazon
Nightmare Before Christmas Afghan Blanket
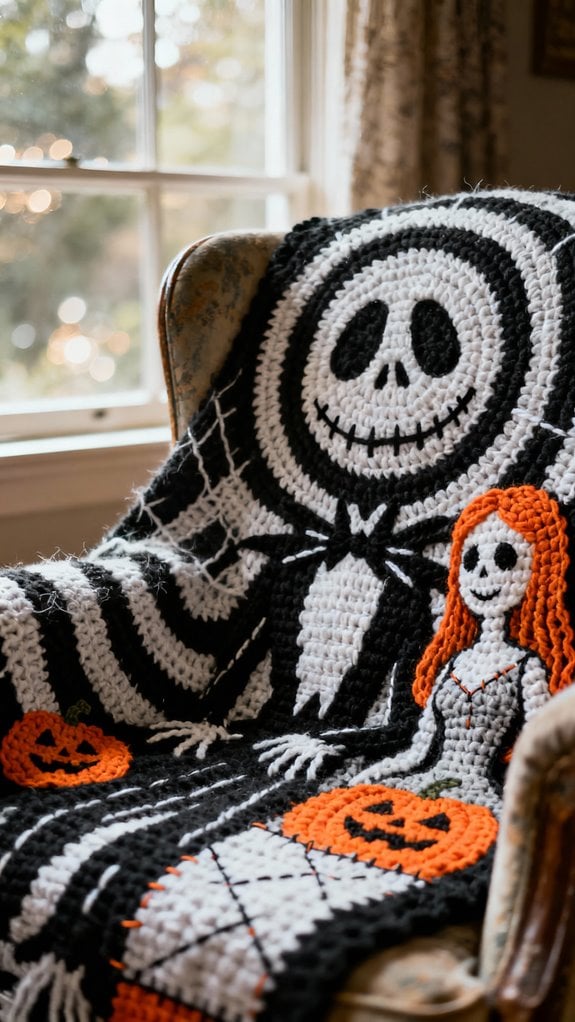
My living room transformed the moment I draped my first Nightmare Before Christmas afghan across the couch—it became an instant conversation starter at every gathering. I chose a graph-style pattern featuring Jack's iconic face against a black background, working with worsted weight yarn in stark white and deep black.
The project took me three weeks, crocheting two hours nightly. I used the corner-to-corner technique, which made following the pixel-style chart straightforward. Each diagonal row built the image gradually, revealing Jack's haunting smile piece by piece.
For beginners, I'd recommend starting with simpler character silhouettes before tackling detailed facial features. The finished 50x60-inch blanket uses approximately 2,400 yards of yarn. I added a purple border as a nod to the film's atmospheric color palette. Look for this item on Amazon
Jack Skellington Granny Square Blanket
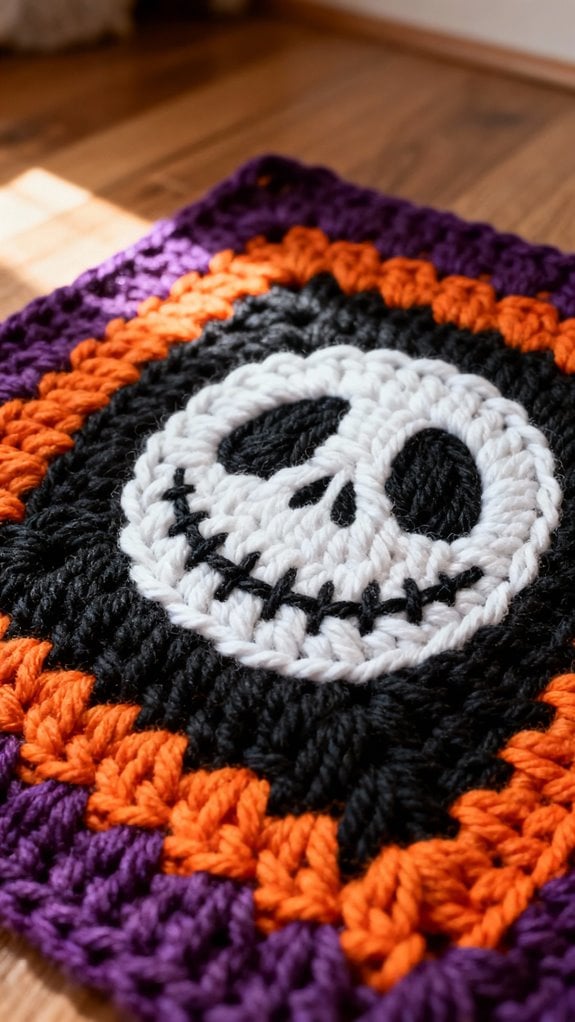
Granny squares offer a modular approach that's perfect for capturing Jack's distinctive features across multiple blocks. I've made three of these blankets, and each time I'm amazed at how the individual squares come together to reveal Jack's iconic face.
Start with basic granny squares in black, white, and gray. You'll arrange them to form Jack's skull, eye sockets, and that memorable stitched smile. I recommend laying out all your squares before joining them—trust me, I learned this the hard way after rearranging blocks twice!
The beauty here is flexibility. Make it lap-sized with 35 squares or go king-sized with 150. Each square works up quickly, making this ideal for portable projects. Border yours in deep purple for that perfect Halloween touch. Look for this item on Amazon
Spiral Hill Scene Blanket

The swirling, moonlit silhouette of Spiral Hill creates one of the most breathtaking crochet challenges I've tackled from this film. I used the intarsia technique to capture that iconic curved hill against a gradient night sky, evolving from deep purple to midnight blue.
Start with your background sky, working in rows while color-changing strategically. For the hill itself, I switched to black yarn and followed a carefully plotted spiral curve pattern. Jack's silhouette required single crochet stitches in the thinnest black yarn I could find.
The moon? I crocheted a separate white circle and appliquéd it on. This blanket took me three weeks, but watching that spiral emerge row by row was absolutely magical. It's stunning draped over any couch. Look for this item on Amazon
Halloween Town Character Garland

When you're looking to add festive charm without committing to a massive blanket project, this character garland delivers pure Halloween Town magic in bite-sized pieces. I've strung mine across my mantel every October since 2019, and guests always ask where I bought it.
Each character measures roughly 4-5 inches tall, making them perfect for quick weekend crafting. I'd recommend starting with Jack, Sally, and Zero—they're the most recognizable trio. Use black yarn for Jack's pinstripe suit, and don't skip the white embroidery floss for his iconic stitched smile.
The beauty here is customization. I've added Oogie Boogie, the Mayor, and even Lock, Shock, and Barrel to mine. String them on black ribbon, spacing them 6 inches apart for ideal visibility. Look for this item on Amazon
Jack Skellington Pillow Cover
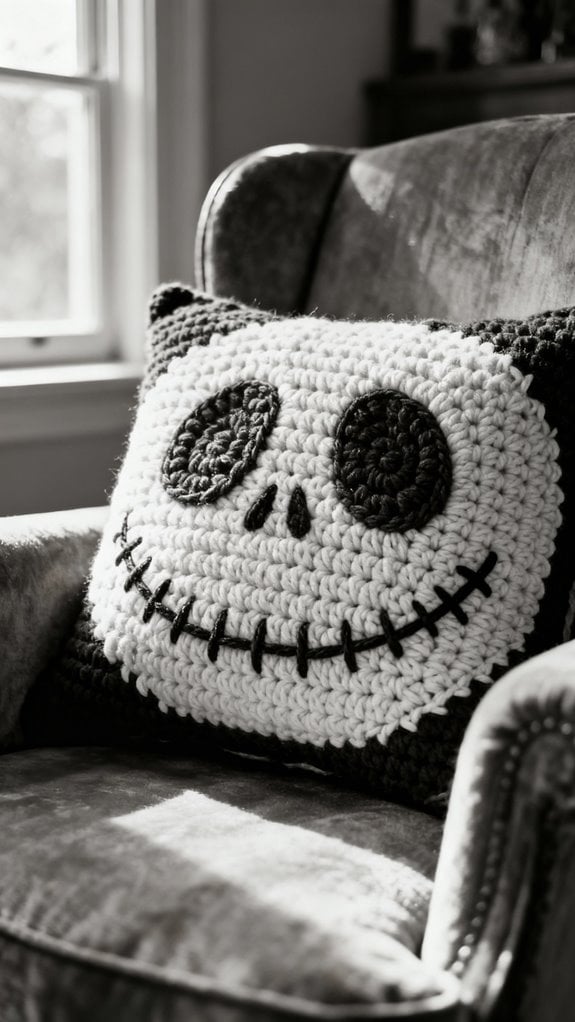
After hanging miniature characters, I needed something more substantial for my couch—something guests could actually interact with. This Jack Skellington pillow cover became my go-to conversation piece.
I crocheted a 16x16 inch square using black yarn, then switched to white for Jack's iconic face. The key is working his features in surface crochet—those hollow eyes and stitched grin pop beautifully against the dark background. I used a tapestry needle to weave in his expression, following a simple grid pattern I sketched beforehand.
The removable cover design means I can wash it easily. I added a zipper along one edge, though buttons work too. Now it's the first thing visitors notice, and it evolves perfectly from Halloween through Christmas. Total project time: one weekend. Look for this item on Amazon
Sally Dress-Up Doll With Wardrobe
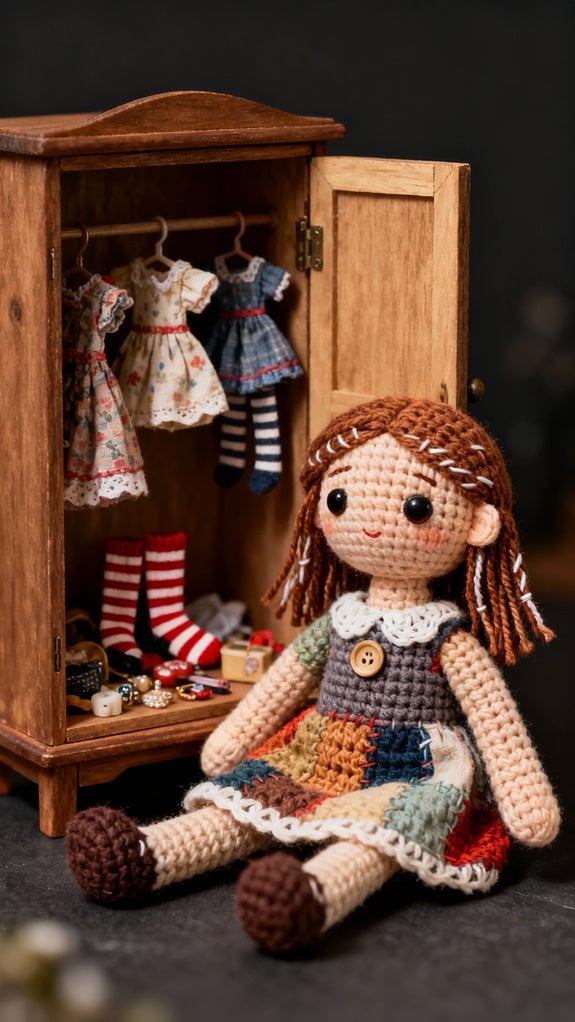
Creating a poseable Sally doll with interchangeable outfits challenged my crochet skills more than any project before it. I inserted bendable wire through her limbs, wrapping each section carefully before crocheting around them. Her iconic patchwork dress required fifteen different yarn colors, which I meticulously arranged to match the film's design.
I've since expanded her wardrobe with a winter coat, nightgown, and even a wedding dress. The key is working with flexible stitches around the joints while maintaining enough tension for durability. I reinforced stress points at shoulders and hips using invisible thread.
My niece plays with this doll constantly, changing outfits daily. Watching her creativity flourish makes the forty-hour investment worthwhile. The poseable feature transforms it from decoration into an interactive toy. Look for this item on Amazon
Zero Appliqué Pattern
Jack's loyal ghost dog deserves recognition in any Nightmare Before Christmas collection, and I've perfected an appliqué pattern that captures Zero's ethereal charm.
I struggled initially getting Zero's ghostly appearance right until I discovered using white sparkle yarn creates that perfect supernatural glow. Start with his floppy ears—they're worked separately using single crochet decreases to achieve the droopy effect. His jack-o'-lantern nose is simply an orange French knot.
The real magic happens when you stitch him onto blankets, bags, or sweaters. I've added Zero to my daughter's backpack, and she's received countless compliments. Use a whipstitch around the edges for secure attachment, leaving his ears slightly unattached so they maintain dimension. This versatile pattern transforms any item into a Nightmare Before Christmas treasure. Look for this item on Amazon
Jack Skellington Christmas Stocking
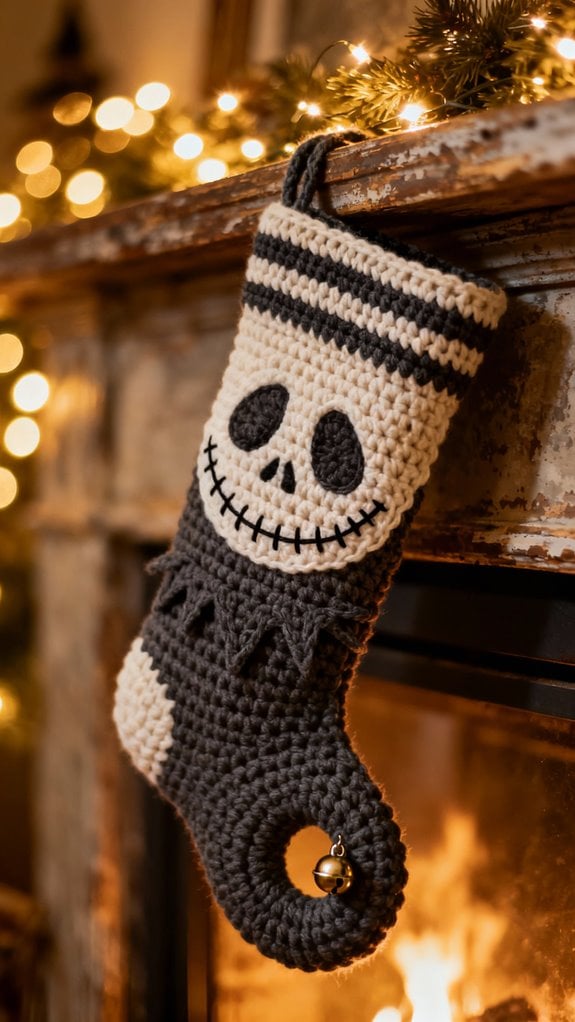
Every holiday season, stockings hung by the fireplace become the focal point of Christmas morning anticipation, and this Jack Skellington design has become my most requested pattern year after year.
I craft this stocking using black yarn for the base with white details for Jack's iconic pinstripe suit and expressive face. The construction involves working in rounds from the cuff down, then shaping the heel and toe using traditional stocking techniques.
For Jack's face, I chain-stitch his signature stitched smile and use felt circles for those haunting eye sockets. The bat bow tie adds the perfect finishing touch. I recommend using worsted weight yarn and a 5mm hook for ideal drape. This intermediate-level project takes about eight hours to complete, creating a stunning keepsake that'll hang proudly for decades. Look for this item on Amazon
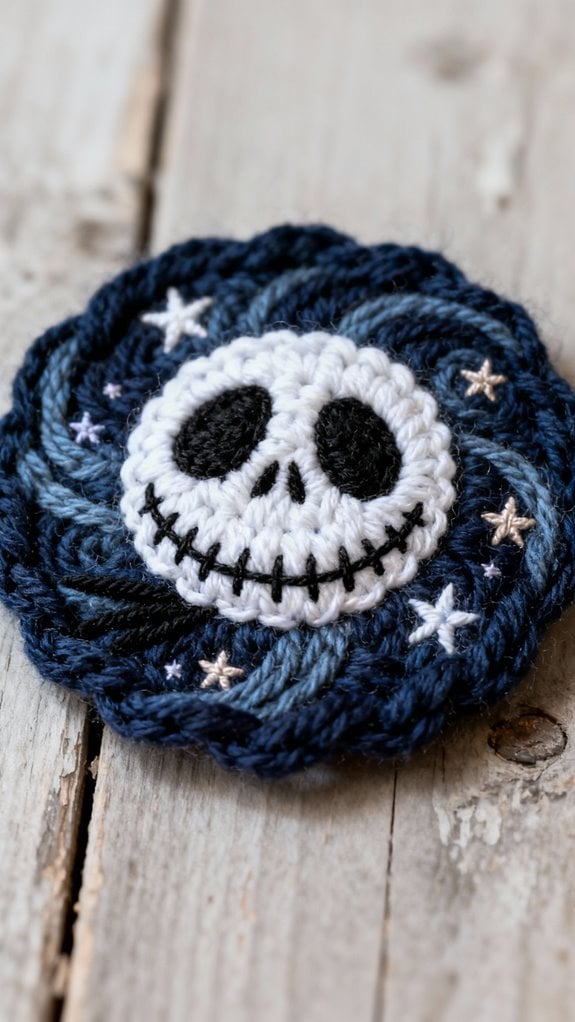
Nightmare Before Christmas Ornament Set
While stockings anchor the fireplace mantel beautifully, I've discovered that filling the entire Christmas tree with handmade Nightmare Before Christmas ornaments creates an even more dramatic holiday display.
I crocheted my first ornament set last December, starting with mini Jack heads using white yarn and embroidered faces. Each ornament took about 30 minutes to complete. I stuffed them lightly with fiberfill and attached silver hanging loops.
The set expanded to include Zero's ghost form, striped snakes, and tiny presents. I used size 10 crochet thread for delicate details and sport weight yarn for fuller ornaments.
My favorite technique involves crocheting flat circular designs featuring character silhouettes. They're quicker than 3D versions and showcase Tim Burton's iconic imagery perfectly. I've made twenty ornaments so far, transforming my tree into Halloween Town's Christmas celebration. Look for this item on Amazon
Oogie Boogie Dice Bag

The burlap texture of Oogie Boogie's sack-like body translates perfectly into a functional dice bag for tabletop gaming. I've made three of these for my D&D group, and they're always conversation starters at game night.
You'll work this bag in a tan or beige yarn using single crochet stitches throughout. The key is maintaining loose tension to mimic burlap's rough weave. I recommend starting with a magic ring and working in continuous rounds until you reach your desired height – mine measures about 6 inches tall.
For Oogie's signature look, embroider black stitches in horizontal lines across the bag. Add his menacing grin using black yarn and a tapestry needle. Finish with a drawstring closure using twisted cords, and you've got yourself a villain-worthy dice keeper! Look for this item on Amazon
Jack and Sally Coffee Cup Cozy

Since coffee runs are my daily ritual, I've crocheted matching Jack and Sally cozies that transform my plain paper cups into Nightmare Before Christmas tributes. Jack's cozy features his iconic pinstripe suit in black and white single crochet stripes, while Sally's showcases her patchwork dress with colorful squares. I work these in the round to fit standard coffee sleeves, measuring roughly 10 inches around and 3 inches tall.
The beauty lies in the details—I embroider Jack's bat bow tie with a running stitch and add Sally's stitched seams using contrasting yarn colors. Both cozies button at the back for easy removal and washing. They're conversation starters at every coffee shop, and the insulation actually keeps my hands comfortable while my drink stays hot longer. Look for this item on Amazon
Sandy Claws Amigurumi
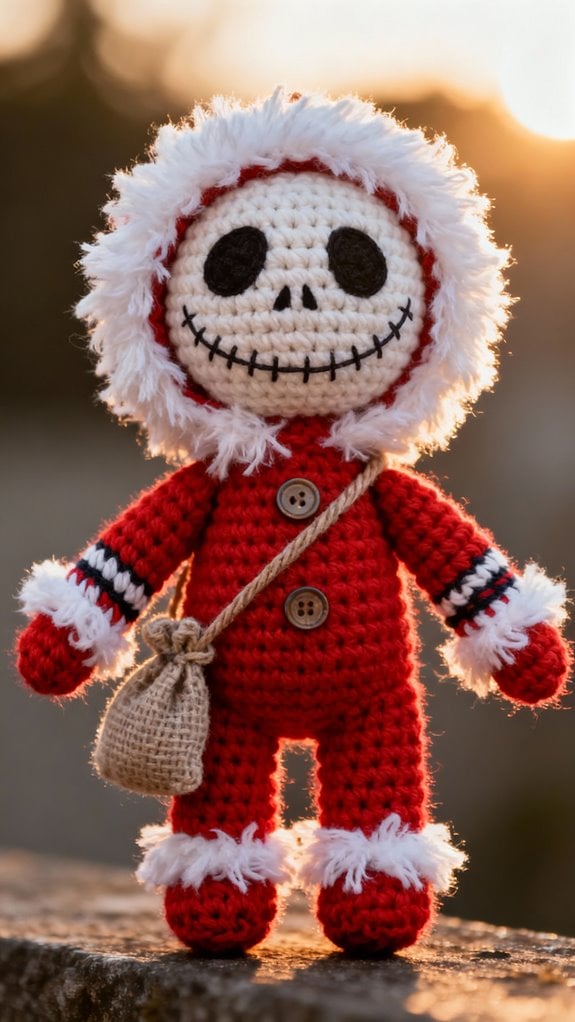
Moving beyond wearable crochet, I've found that creating a Sandy Claws amigurumi captures one of the film's most hilarious misunderstandings in soft, huggable form. I still laugh remembering Jack's confused interpretation of Santa Claus!
This pattern requires red worsted weight yarn for Santa's suit, cream for his beard, and black for boots. I start with the head, working in continuous rounds to avoid seam lines. The beard needs extra attention—I use a loop stitch technique to create that fluffy texture. When I attached the arms to my first Sandy Claws, I positioned them slightly outward to mimic his alarmed expression in the film.
The key is stuffing firmly so he maintains his shape. Safety eyes add personality, though I've embroidered them for child-safe versions. Look for this item on Amazon
Mayor Two-Face Doll
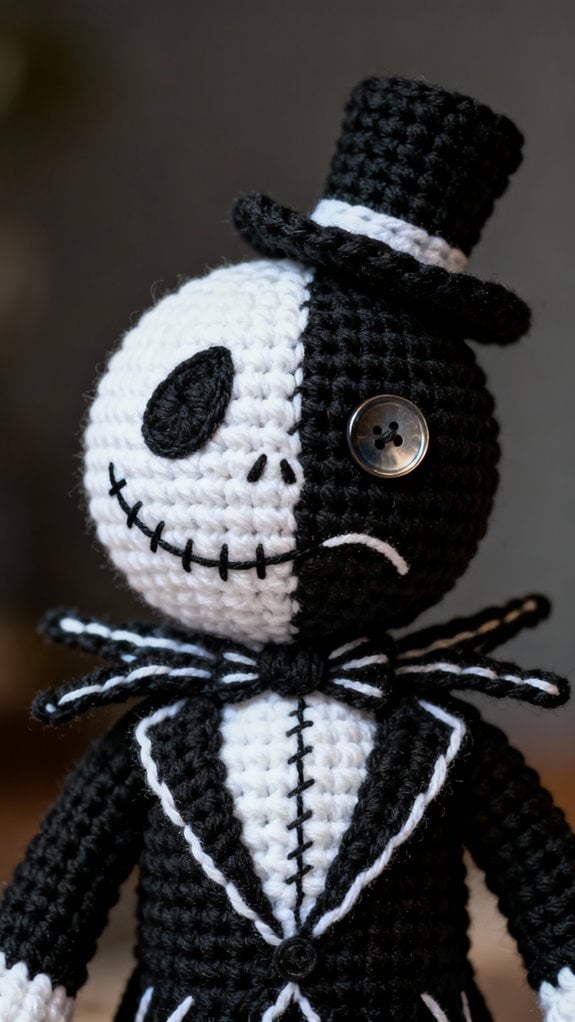
Creating this dual-personality politician remains my favorite technical challenge in Nightmare Before Christmas amigurumi. The Mayor's spinning head requires ingenious construction—I crocheted two separate faces, then attached them to a cylindrical core that actually rotates within his body.
For his happy face, I used bright white yarn with rosy pink cheeks and a wide smile. The worried face gets pale gray yarn with downturned features. I embedded a wooden dowel through the center, allowing the head to spin smoothly.
His cone-shaped body worked up quickly in black, while his spider-leg bow tie demanded careful shaping. The real trick? Creating a snug enough neck opening that the head rotates but doesn't wobble. I tested three different collar constructions before achieving the perfect balance. Look for this item on Amazon
Jack Skellington Earflap Hat
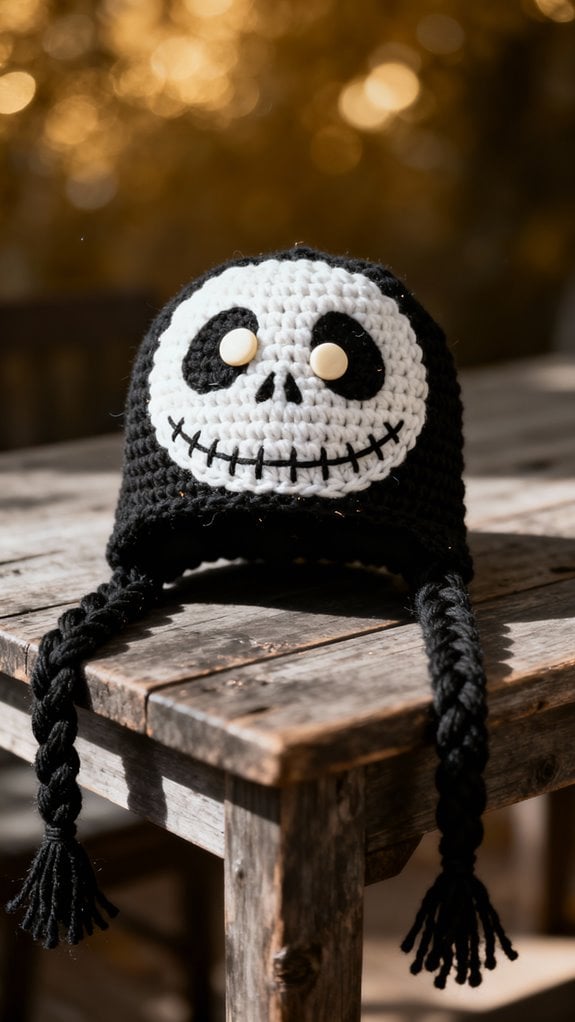
The pattern uses basic stitches—double crochet for the main body and single crochet for the earflaps. I work in black yarn, then surface crochet white stripes around the crown to capture Jack's iconic pinstripe suit. His face requires embroidery: two black oval eyes and that characteristic stitched smile.
The earflaps aren't just decorative; I make them extra-long with braided tassels. Last winter, my nephew wore his skiing, and it stayed put perfectly.
Size adjustments are straightforward—just add or subtract rounds before decreasing. I recommend worsted weight yarn for durability and warmth. Look for this item on Amazon
Sally Inspired Scarf and Gloves Set

Sally's patchwork dress translates beautifully into a mismatched scarf and fingerless gloves set. I've made three of these, and each one turned out uniquely stunning. You'll crochet strips in different yarn colors—I used teal, purple, orange, and black—then whipstitch them together to create that signature patchwork look.
For the scarf, work six strips of varying widths using single and double crochet stitches. The gloves require careful thumb placement; I've found counting exactly fifteen stitches before creating the thumb hole prevents sizing mishaps.
Add running stitches with contrasting embroidery floss across the seams to mimic Sally's rag-doll aesthetic. This detail makes the difference between "Halloween-themed" and "Sally-inspired." The fingerless design keeps your hands warm while letting you scroll through phones effortlessly. Look for this item on Amazon
Nightmare Before Christmas Bookmark Collection
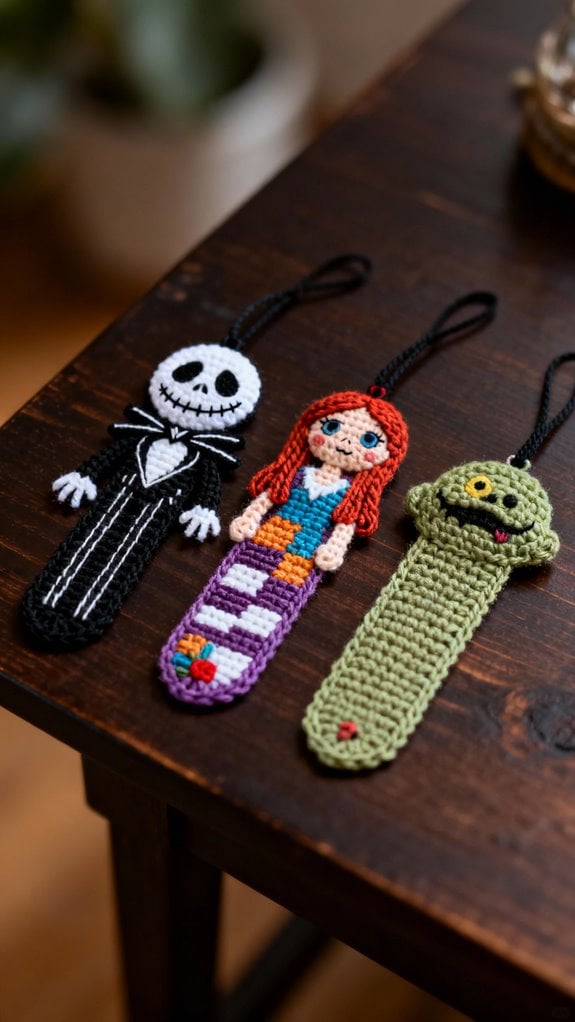
Bookmarks might seem like simple projects, but I've discovered they're perfect for testing new character designs before committing to larger pieces. I created a complete set featuring Jack, Sally, Zero, and Oogie Boogie—each measuring 6 inches long and 2 inches wide.
Start with worsted weight yarn in your character's primary color. Chain 12, then work single crochets back and forth for 15 rows. I add character features using surface crochet for Jack's pinstripes and felt appliqués for facial details. Zero's ghost shape works beautifully as a flat bookmark, and I attached an orange pumpkin nose using a French knot.
For durability, I weave in ends meticulously and add a tassel at the bottom. These bookmarks work up in under an hour, making them perfect last-minute gifts. Look for this item on Amazon
Conclusion

I've absolutely loved curating these 22 patterns for you! Last Halloween, I crocheted the Jack Skellington hat and wore it constantly—strangers stopped me everywhere asking where I got it. Now I'm tackling Sally's scarf set for this winter. Trust me, once you start hooking these spooky-sweet creations, you'll want to make them all. Grab your yarn and let's bring Halloween Town to life together!