15 Best Crossbody Bag Sewing Ideas You Need To Try!
I’ve spent years perfecting crossbody bag patterns, and I’m excited to share my fifteen favorites with you. These aren’t just basic pouches—I’m talking about designs with accordion gussets, convertible straps, and professional finishing techniques that’ll make people ask where you bought it. Whether you’re drawn to sustainable cork fabric or prefer classic cotton, I’ve tested each pattern to guarantee you’ll get polished results. Let me show you which projects are worth your time and why they’ve become my go-to recommendations.
Key Takeaways
- Boxed corners and accordion gussets transform flat fabric into functional crossbody bags with adjustable depth from 2″ to 6″.
- Foundation paper piecing and quilting techniques create sharp geometric designs with professional-quality visual appeal.
- Interior zipper pockets, card slots, and magnetic snap compartments enhance organization and security for everyday items.
- Cork fabric and vegan leather provide waterproof, eco-friendly exterior options while maintaining a polished aesthetic.
- D-rings with swappable straps, contrast binding, and embroidery allow complete customization of crossbody bag designs.
Irene Crossbody Bag With Accordion Gussets
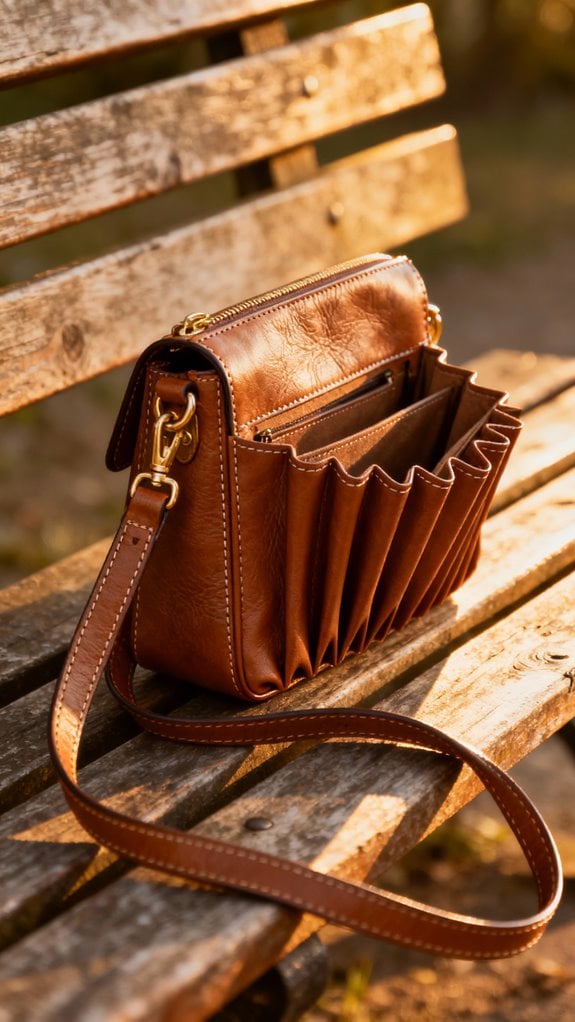
The Irene Crossbody Bag pattern transformed my approach to everyday bag-making when I first discovered its clever accordion gussets. These expandable sides let the bag shift from a slim 2″ depth to a generous 6″ when I need extra capacity—perfect for travel days or grocery runs.
I love mixing the five pocket styles across the front and back panels. My favorite combination features a zippered front pocket with magnetic snap flap pockets on the back for quick phone access.
The extra-long 2-way zipper opens wide, making it surprisingly easy to find items inside. While the pattern suits advanced beginners, I’d recommend practicing curved seams first. The full-color instructions and video tutorials guide you through every zipper installation and gusset attachment beautifully. The pattern includes SVG files for cutting machines in the 12 x 24 format, which streamlines the cutting process significantly. Additionally, you can personalize your bag with customization ideas such as pockets and zippers to make it uniquely yours.
Convertible Cross Body Tote for Multiple Wearing Styles

While accordion gussets offer impressive expandability, I’ve found convertible cross body totes give me even more flexibility through their multiple wearing options. I love how these bags shift from shoulder to crossbody style using adjustable straps with swivel snap clips and D-rings.
For my first convertible tote, I used fat quarters for the exterior and interior fabrics, adding fusible fleece for stability. I included exterior zipper pockets and interior slip pockets for organization. The key is choosing quality hardware—magnetic snaps and sturdy clips make conversion effortless. When constructing the bag, I cut 1 1/2 inch squares from the bottom corners to create perfectly boxed corners that give the tote structure and depth. Beginner-friendly projects can help you master these techniques.
I recommend starting with free PDF patterns available online. Many include video tutorials with detailed cutting charts. The hands-free crossbody design is perfect for travel and daily errands, keeping everything organized and accessible while complementing various outfits.
Double Compartment CrossBody Bag for Sleek Organization

I’ve discovered that double compartment crossbody bags solve my biggest purse problem—digging through a jumbled mess to find my keys. These designs feature two fully zippered sections that keep my phone and sunglasses separate from my wallet and keys, preventing scratches while making everything instantly accessible. Additionally, incorporating functional features like adjustable straps and internal pockets can enhance the usability of your bag.
I recommend starting with patterns like the Yara bag (10″ x 10″ x 3″), which uses simple “sewing origami” techniques perfect for beginners. You’ll construct separate panels for each compartment, eliminating tricky alignment issues. I typically use cotton exterior fabric with fusible fleece for structure, requiring just 1/4-1/2 yard of material. The pattern also includes thoughtfully placed pockets with a front exterior zippered pocket and divided slip pocket, plus interior storage options for maximum organization.
The beauty lies in customization—I’ve added exterior zipper pockets, personalized straps, and color-blocked panels. This hands-free design works brilliantly for travel and daily errands.
Tower Crossbody Bag With Unique Design Details

After mastering double compartments, I’m now obsessed with a different kind of structured bag—one that uses architectural details to create visual impact. The Tower Crossbody captivates me with its recessed zipper closure and darted bottom panels that create genuine three-dimensional shaping.
I love customizing the side tabs with cork or leather remnants—they’re secured with rivets for durability and visual interest. You’ll need a 14″ handbag zipper, two 9″ zippers for internal and external pockets, plus 1″ metal hardware for the adjustable strap. To ensure your bag not only looks great but also lasts, consider using durable fabrics and hardware for enhanced longevity.
Construction requires about 1 yard exterior fabric and foam interfacing like Soft and Stable. Most home machines handle this beginner-friendly project in roughly 3 hours. I’ve tested various substrates—quilting cotton, vinyl, cork—and recommend checking layer thickness beforehand. The finished bag measures 10″ long x 10-1/2″ high, creating a perfectly proportioned silhouette that’s both practical and stylish.
Perfect Crossbody Tote With Shaped Gussets

Since discovering shaped gussets, I’ve transformed how I think about tote bag construction—these precisely engineered panels create professional depth and structure that flat-sided bags simply can’t match.
I measure my gusset width carefully, knowing it directly determines my tote’s capacity. For box corners, I divide the desired depth in half for corner cutouts. I always add seam allowances to every pattern piece—it’s essential for flush seams.
My construction secret? I reinforce gussets with fusible interfacing before assembly. I clip curves to prevent bunching and use the drop-in method for easier sewing. Canvas or denim works beautifully for structure, as they are some of the recommended fabrics for bag making.
I attach crossbody straps directly to gusset seams for maximum strength. Cotton oxford fabric is easy to sew and makes excellent material for structured bags with gussets. The result? A tote that stands upright, carries weight confidently, and looks professionally made.
Easy Sling Bag for Everyday Use

When I need a hands-free bag that works for quick errands or full-day adventures, I reach for my handmade sling bag every time.
I construct mine with single pleats on both sides, which lets the bag expand for daily essentials while keeping its shape. The secret to professional results? Layer cotton flannel between your exterior fabric and lining, then add fusible fleece for stability. I always use a heavyweight denim needle to power through these multiple layers. Incorporating reinforcement points during construction will enhance the bag’s durability.
My favorite feature is the adjustable strap with D-rings and a swivel hook—I can wear it across my chest, on my back, or over either shoulder. The two interior pockets positioned 1.5 inches from the top keep my phone and keys organized. I sew a button above the pleat on the exterior for a functional closure that adds style. This intermediate-level project requires about 1.25 yards of fabric.
Easy Crossbody Zipper Tote for Beginners

I built my first crossbody zipper tote with just 13 by 11-inch fabric pieces, and it’s still my go-to bag three years later. Canvas exterior paired with cotton lining creates durability, while M33 interfacing adds structure without stiffness. The interior zipper pocket installation seemed intimidating initially, but centering the tape along the top edge and topstitching 2 inches from corners proved straightforward. I recommend purchasing zippers by the yard since you can customize the length for any project and save money compared to buying pre-cut zippers.
For added creativity, consider incorporating customization options like embroidery or applique to make your bag truly unique. For the adjustable strap, I used 125cm of 2.5cm webbing with rectangle rings and slider hardware. Switch to a denim 110/18 needle when sewing through thick layers—I learned this after breaking two regular needles! The utility stitch secures straps better than straight stitching. Boxed corners transformed my flat bag into a functional 35cm by 25cm tote with 10cm depth, perfect for daily essentials.
Quilted Cross Body Bag With Geometric Patterns

After mastering the basics with a simple zipper tote, I was ready to add some visual wow-factor to my next project. I chose a quilted crossbody with chevron patterns, and the precision required completely transformed my sewing skills. The process of creating a quilted bag often involves essential hardware like zippers and interfacing, which enhances durability and functionality.
I used foundation paper piecing with grid-based marking to achieve sharp geometric lines. My silver marking pen and quilting rulers became essential tools. Layering high-loft polyester batting between cotton outer fabric created that coveted quilted texture while adding structure.
The walking foot was vital when stitching through multiple layers. I reinforced the strap attachment points since geometric quilting adds weight at intersections.
For functionality, I included card pockets and a zippered top closure. The geometric quilting on the front flap became my signature detail that elevated this bag beyond basic. I also added an internal slip pocket for organizing smaller items like my phone and keys.
Mod Satchel Converted to Crossbody Style

Since my geometric quilted bag taught me the value of structured design, I decided my next challenge would be converting a structured satchel into a versatile crossbody.
I discovered conversion kits on Amazon that transformed my bag without permanent modifications. The kit included felt inserts that slid into my satchel’s interior, serving as both attachment points and protective layers against makeup damage. I chose black felt to match my lining.
The hardware piece uses removable D-rings on the top handles—the bottom bar detaches for threading through. I selected gold-tone finishes matching my existing hardware and added a 43-inch chain for crossbody wearing.
The entire conversion took minutes. Now I’ve got hands-free functionality while maintaining my satchel’s original handle option. The weight increase? Barely noticeable during extended wear. For those wanting to create their own satchel from scratch, the pattern uses Dritz Glamour Rings as a cinching mechanism with drawstrings.
Boxy Zipper Bag With Customizable D-Rings

My search for the perfect everyday crossbody led me to a boxy zipper bag pattern that’s become my go-to design. The structured, rectangular shape gives it a modern look while maintaining serious functionality.
I cut my exterior and lining panels to 17″ x 23″, sandwich foam stabilizer between layers, then install a 13.5″ zipper across the top. The game-changer? Those D-rings sewn into reinforced strap tabs. I can swap between a 51″ crossbody strap for errands or a shorter shoulder strap for evenings out.
Creating boxed corners transforms flat fabric into a three-dimensional bag with real depth. I’ve added interior zippered pockets and contrast binding for polish. The full-length zipper keeps everything secure, and topstitching all edges guarantees durability through daily use. For the best results when sewing through multiple layers, I rely on a heavy-duty size 90/14 needle that handles the bulk without breaking.
DIY Crossbody Bag With Secure Zipper Pockets

I always start by marking my zipper box 1.5 inches from the top edge, then sew the rectangular outline before carefully slitting the opening. Using fabric glue to position my zipper makes installation foolproof. I topstitch with a 3.0mm stitch length for that professional finish.
For pocket sizing, I follow this formula: make the lining 3 inches narrower than my bag’s width, with height at 2(x-3) where x equals bag height. I place the pocket piece right sides together with the lining piece, aligning center marks for precise placement. Multiple zipper compartments—front, back, and internal—give me layered security I genuinely rely on.
Bestie Bag With Personalization Options

When I discovered the Bestie Bag pattern last year, it completely changed how I approach crossbody projects—this banana-shaped beauty offers four distinct views that let me customize everything from strap style to pocket placement. I’ve sewn mine in canvas and vinyl, experimenting with webbing straps that feature adjustable sliders and swivel clasps. The medium-sized views work perfectly for daily errands, while the larger versions hold everything for weekend adventures.
What I love most is choosing between fabric or webbing straps and deciding whether to add optional pockets. The zip closure keeps belongings secure, and I often use quilting cotton for lightweight linings. As a confident beginner pattern, it includes clear PDF instructions with photo walkthroughs. The pattern is available as a digital PDF download for $11.00, making it easy to access and print whenever I’m ready to start a new bag. I’ve made five versions already—each one feels uniquely mine.
Crossbody Bag With Adjustable Strap Features

Adjustable straps transformed my crossbody sewing from basic to brilliant—they’re the single feature that makes a bag work for everyone. I install sliding buckles or ladder lock adjusters so wearers can switch between shoulder and crossbody positions instantly. My favorite upgrade? Adding 1.5-inch padded webbing that distributes weight evenly and eliminates shoulder digging during long wear.
I’ve sewn interchangeable straps with swivel clasps, letting friends swap between woven nylon for errands and vegan leather for evenings out. The versatility is unmatched. For security-conscious sewers, I position adjusters to keep bags snug against the body in crowds. Quick-release hardware also enables clutch conversion—just detach the strap. I always check that clasps and buckles are durably constructed since weak hardware defeats the purpose of a well-sewn adjustable strap. Whether you’re sewing for petite frames or tall builds, adjustable features guarantee perfect fit every time. It’s vital versatility sewn right in.
Modern Crossbody Design Using Sustainable Fabrics

Sustainable fabrics have revolutionized how I approach crossbody bag construction—they’re no longer niche materials but everyday essentials in my sewing studio. I’ve switched to cork fabric for exterior panels because it’s naturally waterproof and antimicrobial, plus harvesting doesn’t harm trees. For linings, I prefer organic cotton—it biodegrades beautifully and supports ethical farming.
When I work with vegan polyurethane leather, I achieve that polished look without environmental guilt. My favorite recent project used recycled nylon for straps; it’s incredibly durable for daily wear. I’ve also experimented with natural dyes instead of synthetic ones, which keeps harsh chemicals out of waterways.
The minimalist, modular designs I create with these materials last years longer than fast-fashion alternatives. I focus on creating long-lasting, durable products that withstand daily use and reduce the need for frequent replacements. Start with cork—you’ll immediately notice the quality difference.
Crossbody Bag With Professional Finishing Techniques

After years of sewing crossbody bags, I’ve learned that professional finishing separates handmade projects from store-bought quality—and it’s absolutely within your reach.
I always start with skiving my leather edges before stitching. This simple step removes bulk and creates seamless seams that lie flat. For edge finishing, I alternate between burnishing with beeswax and edge painting, depending on the bag’s style. Burnishing gives that luxurious sealed edge, while painting adds protection against fraying.
Saddle stitching remains my favorite technique—it’s incredibly durable and adds visual appeal that machines can’t replicate. I reinforce all hardware attachment points with extra stitching, preventing wear at stress points. When choosing seam types, I consider both the leather thickness and the bag’s overall architecture to ensure longevity.
Finally, I condition finished bags with beeswax or leather cream. This restores moisture and creates that professional sheen buyers expect.
Conclusion
I’ve discovered that making crossbody bags has transformed my sewing confidence more than any other project. You’ll find yourself reaching for your handmade bag daily, and trust me, the compliments never get old! Start with a simpler design if you’re nervous—I did—then work your way up to those gorgeous accordion gussets. Grab your fabric stash and jump in; you’ve absolutely got this, and I can’t wait to see what you create!
