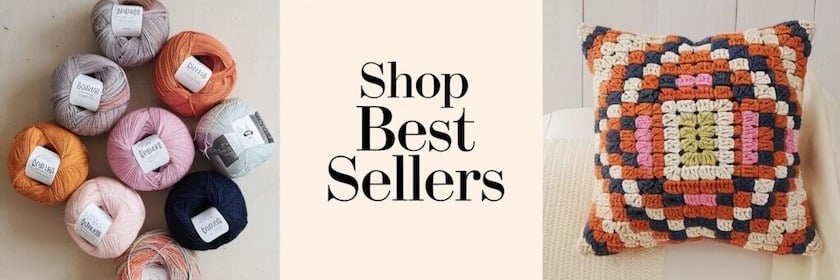
22 Amazing Crochet Christmas Baubles You Will Love!
I've spent years perfecting my crochet ornament collection, and I'm thrilled to share these 22 stunning bauble designs with you. Whether you're drawn to classic red and gold stripes or charming peppermint swirls, each pattern offers something special for your holiday decorating. I'll walk you through techniques like the magic ring and surface crochet, plus show you how to add personal touches with vintage buttons and elegant embellishments. Let's explore what makes each design uniquely beautiful.
Key Takeaways
- Classic designs include red and gold striped baubles, snowflake medallions, peppermint swirls, granny squares, and rustic jute variations.
- Essential techniques involve magic rings, consistent tension, polyester fiberfill stuffing, and appropriate yarn weights for structural integrity.
- Nordic stars, tartan plaids, glittering icicles, and candy cane twists offer diverse design inspirations from traditional to modern.
- Personalized options feature miniature stockings, poinsettia medallions, vintage button ornaments, and angel wing detailed baubles for unique touches.
- Finishing touches like blocking with starch, adding seed beads, surface crochet embellishments, and rustic twine loops enhance overall appearance.
Classic Red and Gold Striped Bauble
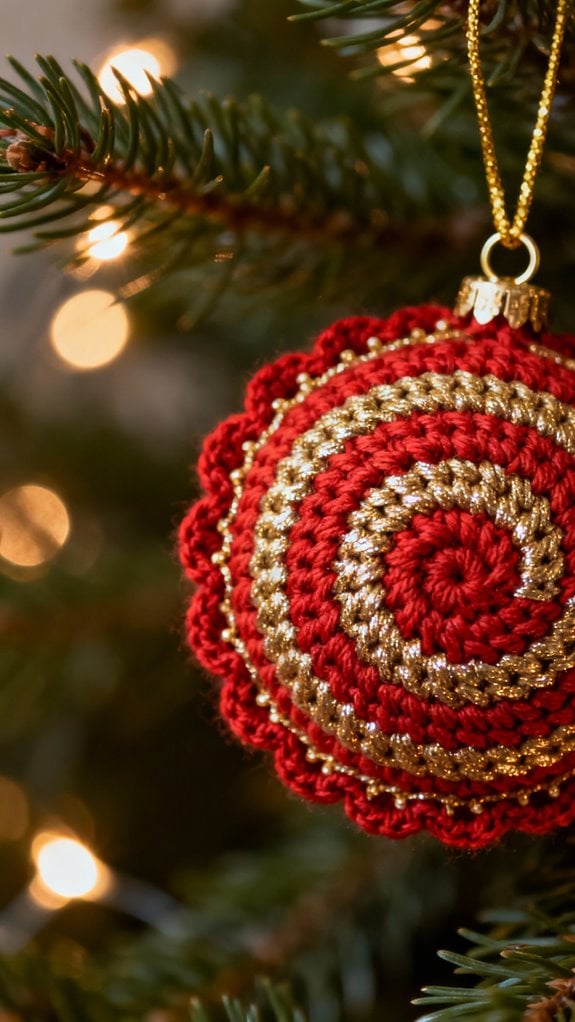
There's something magical about red and gold together—they practically scream Christmas! This striped bauble is perfect for beginners because you'll work in simple rounds using single crochet stitches.
Start with a magic ring and crochet six rounds in red yarn. Switch to gold for the next three rounds, then alternate colors every two rounds. You'll create beautiful, even stripes that catch the light perfectly. Additionally, consider adding crochet embellishments to enhance the overall design and give your baubles a unique touch.
As you work, stuff the bauble firmly with polyester fiberfill to maintain that classic spherical shape. The key is adding stuffing gradually—don't wait until the end or you'll struggle to fill it evenly.
Finish by threading a ribbon loop through the top for hanging. These baubles look stunning clustered on your tree or strung along a mantelpiece. Look for this item on Amazon
Snowflake Medallion Ornament
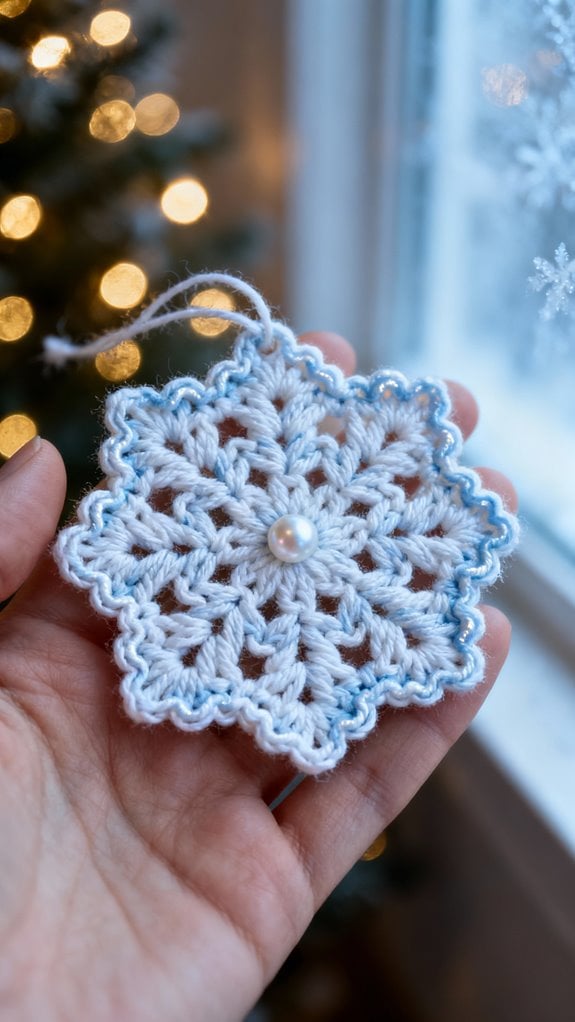
When you want to capture the delicate beauty of winter in yarn, this snowflake medallion ornament is your answer. I'll guide you through creating this elegant design using white cotton thread and a small hook.
Start with a magic ring, then work six double crochets to form your center. Each subsequent round builds outward with strategic increases and chain spaces that create those iconic snowflake points. The key is maintaining consistent tension—too loose and your snowflake looks droopy; too tight and it'll curl.
I recommend blocking your finished medallion with starch or fabric stiffener for that crisp, dimensional look. Pin each point symmetrically while damp, let it dry completely, and you'll have a stunning ornament that catches light beautifully on your tree. Additionally, you can create intricate crochet snowflakes for tree ornaments and family heirlooms. Look for this item on Amazon
Peppermint Swirl Bauble
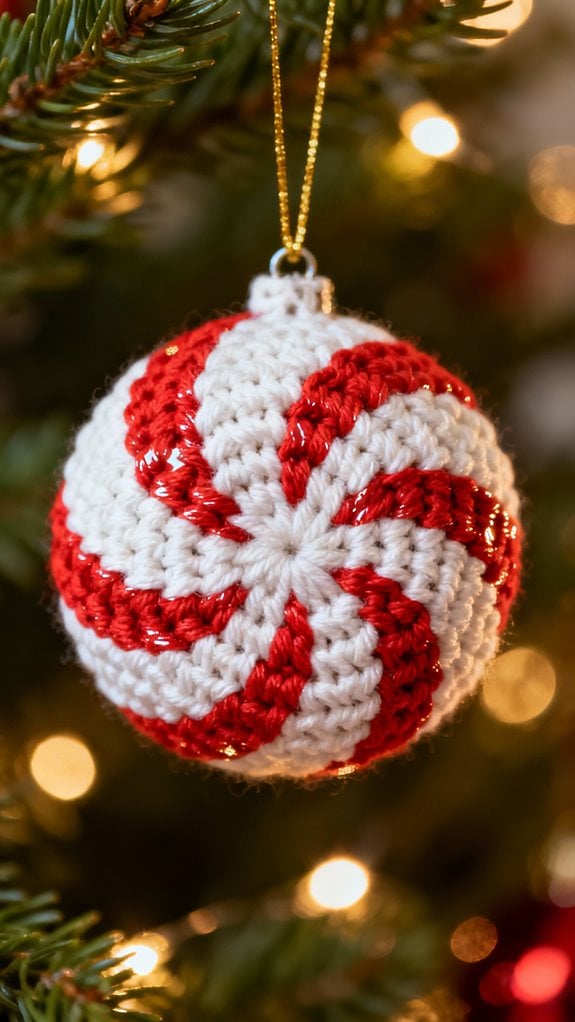
While traditional red and white candy canes inspire countless holiday crafts, transforming that cheerful peppermint look into a crocheted bauble brings something extra special to your tree. I love how the spiral pattern mimics actual peppermint candies perfectly.
You'll create this design by working in continuous rounds with strategic color changes. Start with white yarn, then switch to red every few stitches to build that distinctive swirl effect. The key is maintaining consistent tension so your stripes stay even and defined. Additionally, consider using cotton yarn for crisp color definition. As you decrease toward the top, keep your color changes aligned with previous rounds. The swirl should flow seamlessly from bottom to top. Stuff firmly before closing, and you'll have a bauble that looks good enough to eat! Look for this item on Amazon
Rustic Jute and Cream Bauble
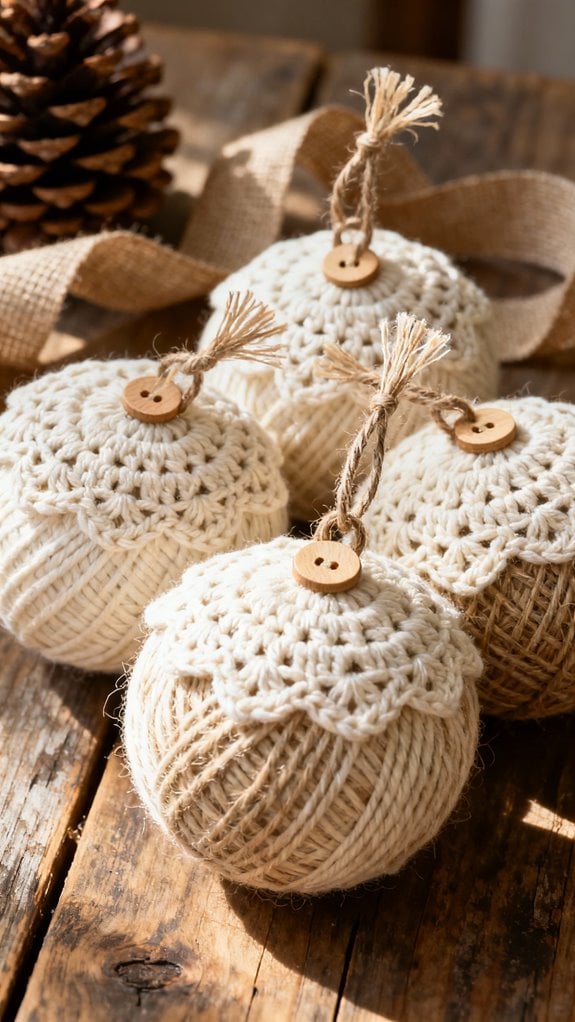
From candy-bright whimsy to natural elegance, this rustic jute and cream bauble brings an earthy, farmhouse feel to your Christmas decor. I'm thrilled to show you how simple natural fibers create stunning ornaments.
You'll work with jute twine and cream-colored cotton yarn, alternating between them in horizontal stripes. The texture contrast is absolutely gorgeous! Start with a magic ring, then crochet in rounds using single crochet stitches. Switch between jute and cream every two rounds to create that signature striped effect.
The jute adds wonderful organic texture while the cream softens the overall look. Stuff your bauble lightly with fiberfill, then close the bottom with invisible decreases.
Add a rustic twine hanging loop, and you've got yourself a charming farmhouse ornament that pairs beautifully with burlap ribbons and wooden decorations. Look for this item on Amazon
Granny Square Christmas Ball
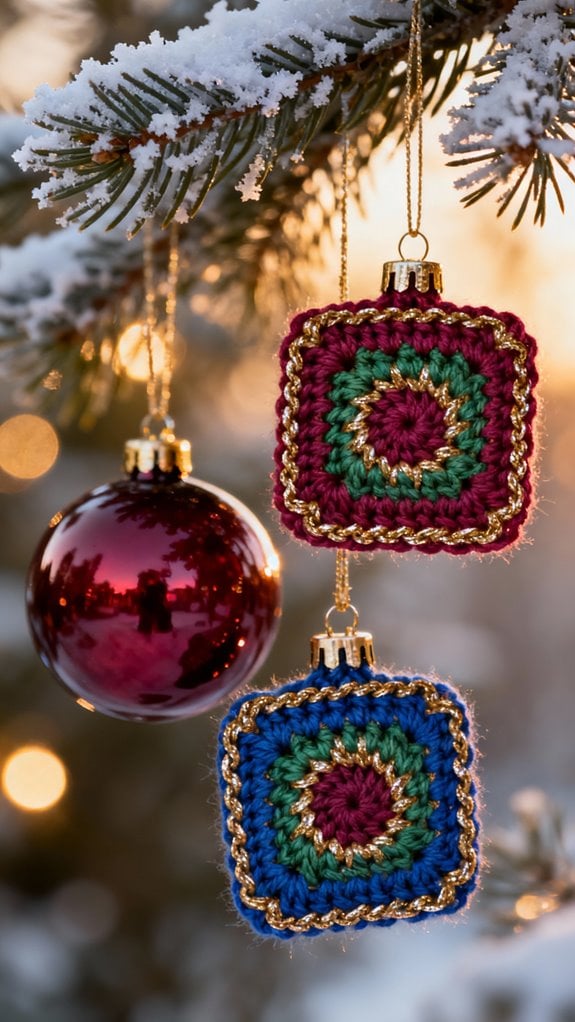
The beloved granny square gets a festive makeover in this delightful Christmas ball ornament! I'm thrilled to show you how traditional granny squares transform into stunning three-dimensional baubles.
You'll crochet six identical granny squares using holiday colors—think rich reds, forest greens, or sparkling whites. The magic happens when you whipstitch these squares together, creating a cube shape that surprisingly resembles a round ornament once stuffed.
I recommend using worsted weight yarn for structure and a 4.0mm hook for tight, even stitches. Before closing the final seam, insert lightweight fiberfill to give your bauble that plump, professional look.
Add a hanging loop using chain stitches, and you've got a gorgeously textured ornament that celebrates crochet's most iconic pattern. It's vintage charm meets Christmas cheer! Look for this item on Amazon
Nordic Star Pattern Ornament
Inspired by Scandinavian folk art, this Nordic star ornament brings crisp, geometric beauty to your Christmas tree! I love how the eight-pointed star design creates stunning visual impact with just two contrasting colors—traditional red and white work beautifully, but you can customize to match your décor.
You'll work this pattern in the round using single and double crochet stitches. The key is maintaining consistent tension to keep those sharp star points looking perfect. I recommend using a smaller hook than usual for your yarn weight—this creates a firmer fabric that holds its shape beautifully.
The finished ornament measures about three inches across, making it ideal for filling tree branches without overwhelming them. Add a hanging loop, and you've created a striking Scandinavian-inspired decoration that'll become a cherished holiday tradition! Look for this item on Amazon
Glittering Icicle Bauble
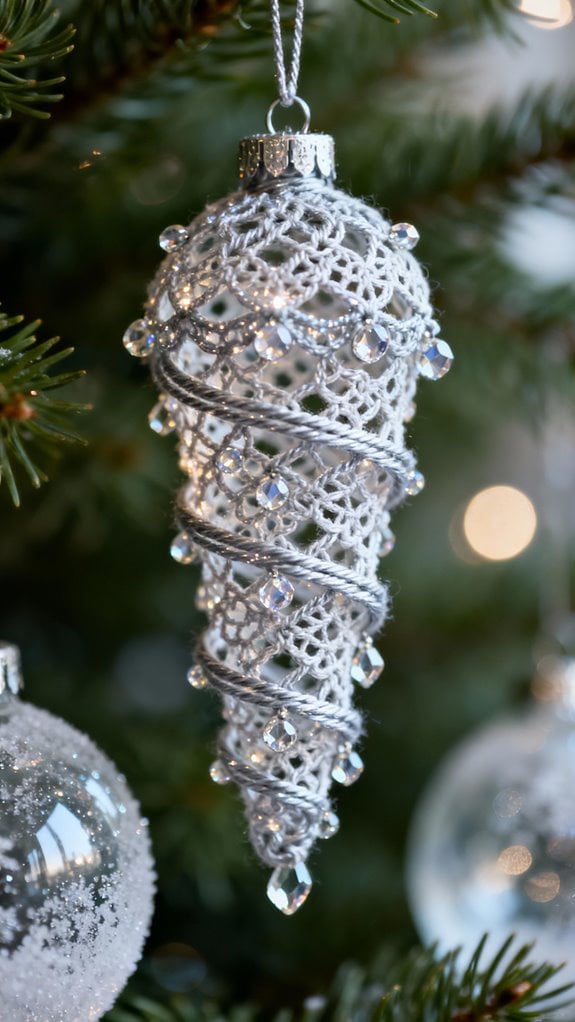
Capturing the delicate beauty of winter frost, this glittering icicle bauble adds elegant sparkle to your holiday display! I'll guide you through creating this stunning elongated ornament that shimmers like frozen crystals.
You'll work in continuous rounds, starting with a narrow top and gradually increasing to form the distinctive icicle shape. The secret lies in using metallic yarn or adding silver thread alongside your white or pale blue base yarn. This creates that magical frosty shimmer.
I recommend incorporating longer chains between stitches to form delicate points along the sides, mimicking natural ice formations. For extra glamour, you can embellish with clear seed beads or sequins as you crochet.
The finished piece measures approximately 6 inches long, making it perfect for dangling from tree branches where it'll catch the light beautifully! Look for this item on Amazon
Reindeer Silhouette Ornament
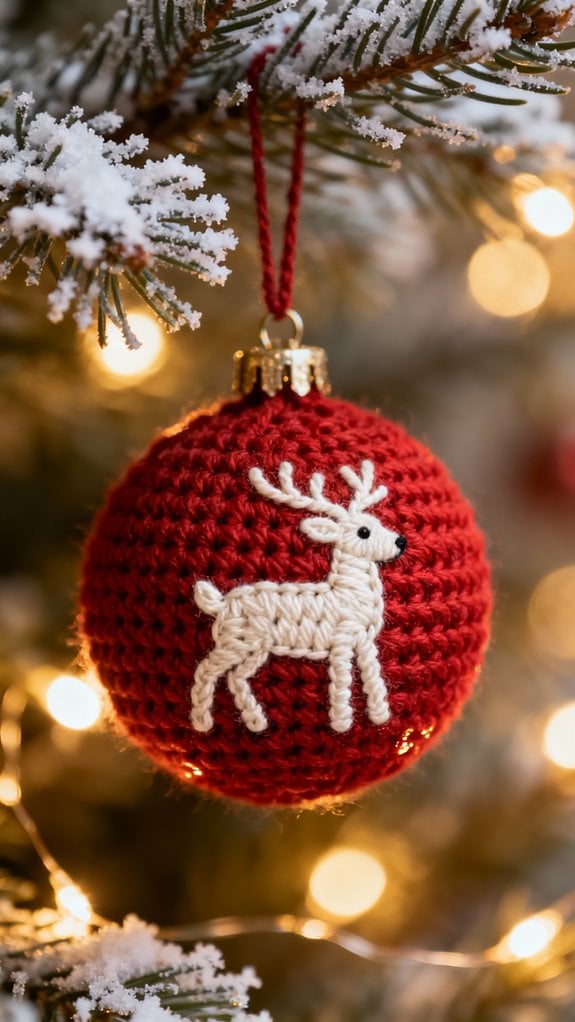
Nothing says "rustic Christmas charm" quite like a reindeer silhouette against winter sky! I'll show you how to create this stunning ornament that combines simplicity with elegance.
Start by crocheting a circular base in white or pale blue yarn using single crochet rounds. Once you've reached your desired bauble size, it's time to add the magic. Using black embroidery floss or thin yarn, stitch a reindeer silhouette directly onto the surface. Focus on the distinctive antlers and proud stance that make reindeer instantly recognizable.
I recommend sketching your design on paper first, then marking dots on your bauble with pins. This guarantees perfect placement before you commit to stitching. Add a hanging loop, and you've created an ornament that captures winter's peaceful beauty. Look for this item on Amazon
Candy Cane Twisted Bauble
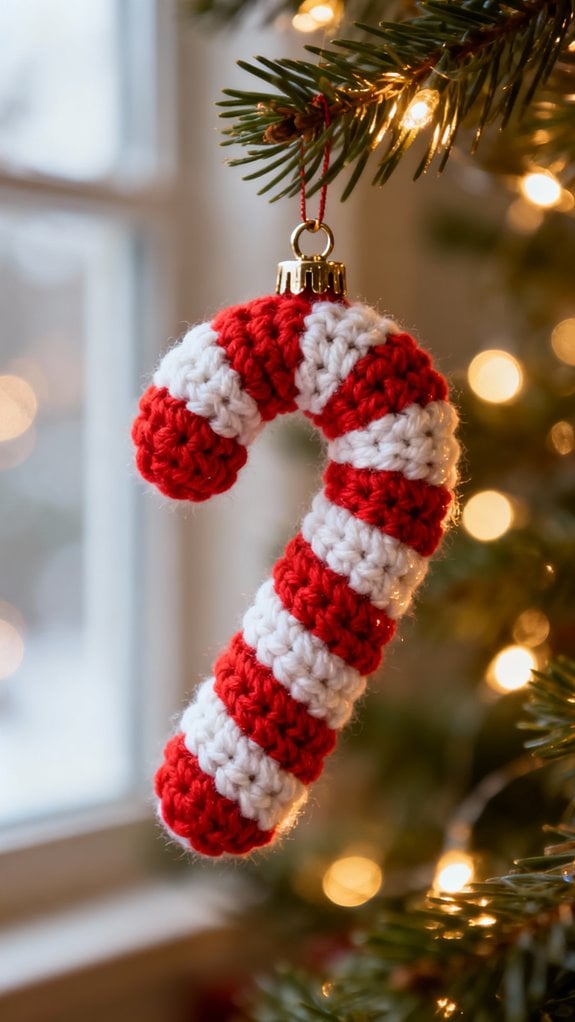
The iconic red-and-white spiral of a candy cane transforms beautifully into crochet form with this twisted bauble design! I'll show you how to create this eye-catching ornament using a simple color-changing technique.
Start by crocheting two long strips—one in red, one in white—using single crochet stitches. Keep them identical in length and width. Once complete, lay them side by side and twist them together gently, creating that signature candy cane spiral. Secure the ends with a few strategic stitches to maintain the twist.
Next, carefully coil your twisted rope into a ball shape, stitching as you go to hold everything in place. Add a hanging loop at the top, and you've created a festive bauble that captures Christmas magic perfectly! Look for this item on Amazon
Victorian Lace Doily Ornament
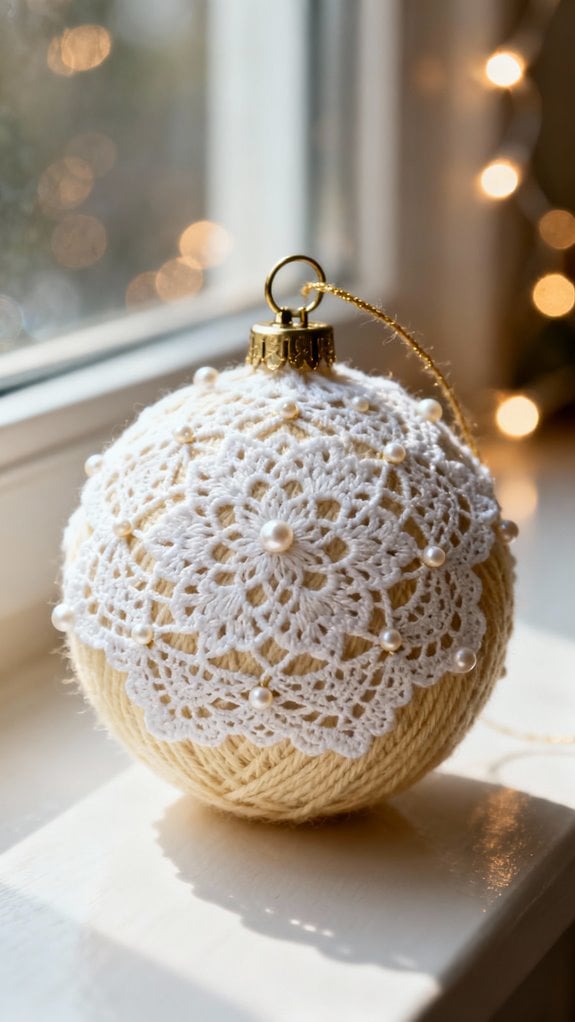
While candy canes bring bold, playful charm to your tree, sometimes you want to add a touch of delicate elegance instead. That's where Victorian lace doily ornaments shine beautifully.
I love creating these intricate pieces using fine crochet thread and a small steel hook. You'll work circular motifs with classic lace stitches like picots, clusters, and chain loops. The key is maintaining consistent tension so your stitches stay uniform and delicate.
Start with a magic ring, then build outward in rounds. I typically work mine to 3-4 inches in diameter. Once finished, stiffen your doily with fabric stiffener or sugar water solution. Shape it over a bowl while damp to create a gentle dome effect.
Thread ribbon through the pattern's openings for hanging. These ornaments capture timeless Victorian sophistication perfectly. Look for this item on Amazon
Colorful Rainbow Gradient Bauble

After creating delicate Victorian elegance, you might crave something bright and cheerful that celebrates color itself. This rainbow gradient bauble transforms your tree into a vibrant celebration of the spectrum.
I recommend using fingering-weight yarn in seven colors, shifting smoothly from red through violet. Work two rounds per color, creating seamless stripes that flow beautifully. Start with a magic ring and increase evenly until you reach your desired diameter—typically 3 inches works perfectly.
The gradient effect requires careful color changes. Don't cut your yarn between shifts; instead, carry colors up the inside. This eliminates weaving in dozens of ends later.
Stuff firmly with polyester fiberfill before decreasing for the top. Add a coordinating ribbon loop, and you'll have a stunning ornament that catches light magnificently and brings joy wherever it hangs. Look for this item on Amazon
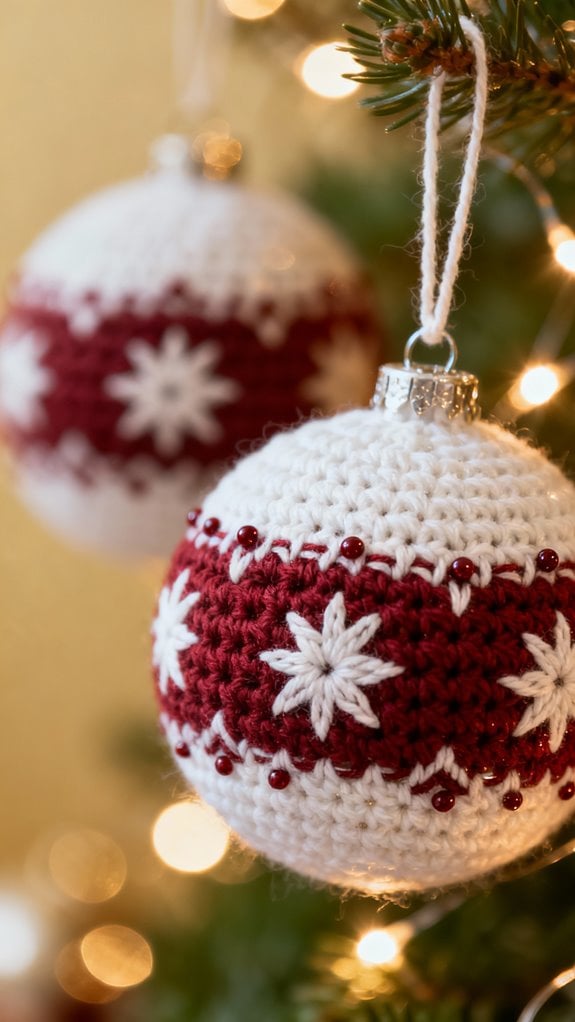
Holly and Berry Embellished Ornament
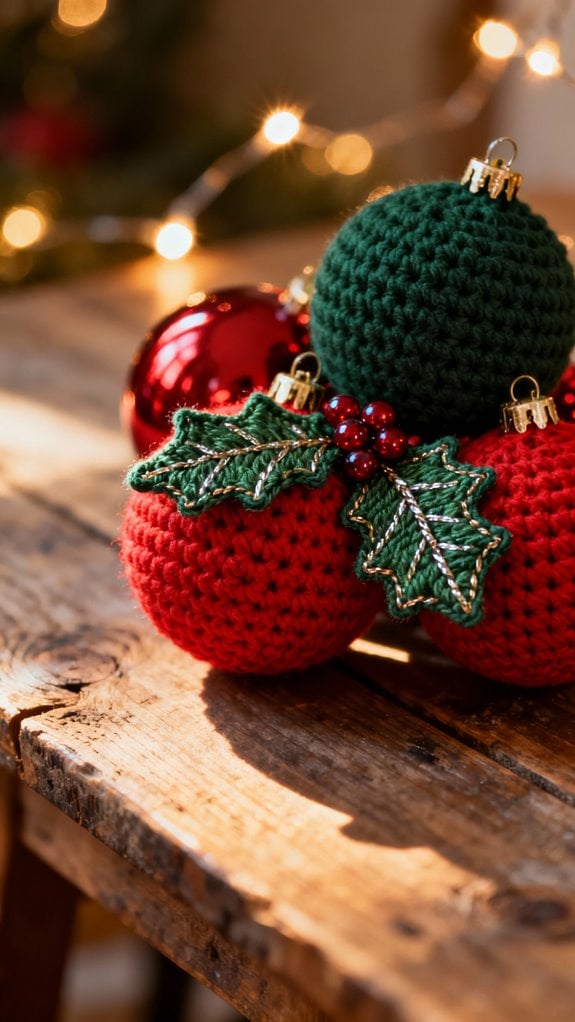
Nothing captures Christmas tradition quite like the iconic combination of deep green holly leaves and bright red berries. I'll show you how to transform a simple crocheted bauble into a festive masterpiece with these classic embellishments.
Start by crocheting your base ornament in cream or white. Then, create small holly leaves using green yarn – work five chain stitches, then slip stitch back along the chain with strategic double crochets at the center to form that distinctive pointed leaf shape. Make three leaves per cluster.
For berries, crochet tiny red spheres using magic rings with six single crochets, increasing slightly before decreasing to close. You'll need three berries per cluster.
Attach your holly and berries at the top of your bauble, just below the hanging loop. This timeless design works beautifully on your tree. Look for this item on Amazon
Gingerbread Man Decorated Bauble
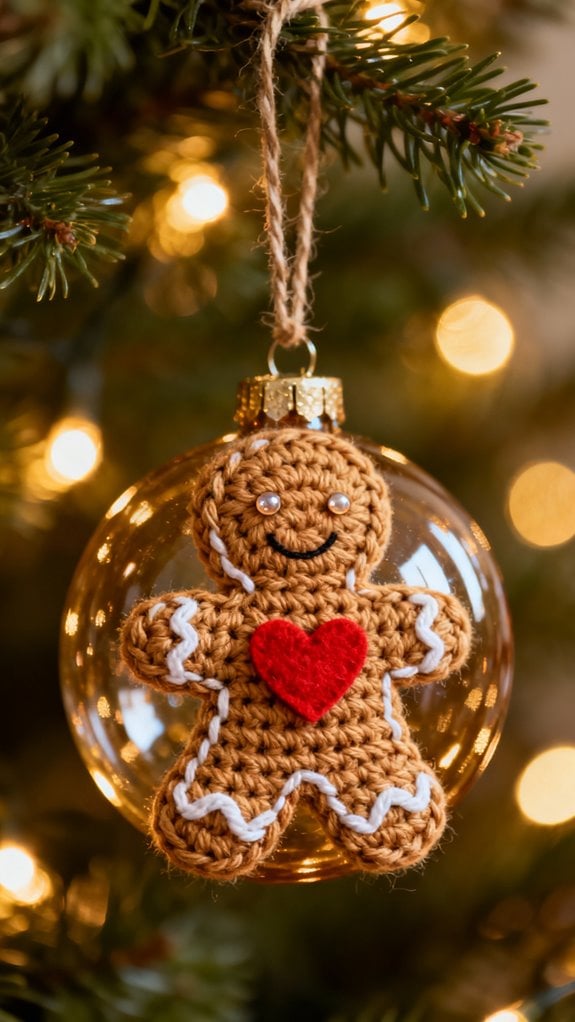
The cheerful gingerbread man brings a sweet, whimsical touch to your Christmas baubles that children and adults alike will adore. I'll show you how to transform a simple crocheted ball into this festive cookie character.
Start with a tan or brown bauble base, then crochet a tiny gingerbread figure using single crochet stitches in rounds. You'll create his round head, plump body, and stubby arms and legs. Add white embroidery floss or thin yarn to stitch his signature icing details—wavy trim along his edges, buttons down his chest, and that classic smiling face.
Attach your gingerbread man securely to the bauble using fabric glue or careful stitching. The dimensional effect creates wonderful texture that makes your ornament truly stand out on the tree. Look for this item on Amazon
Festive Tartan Plaid Ornament
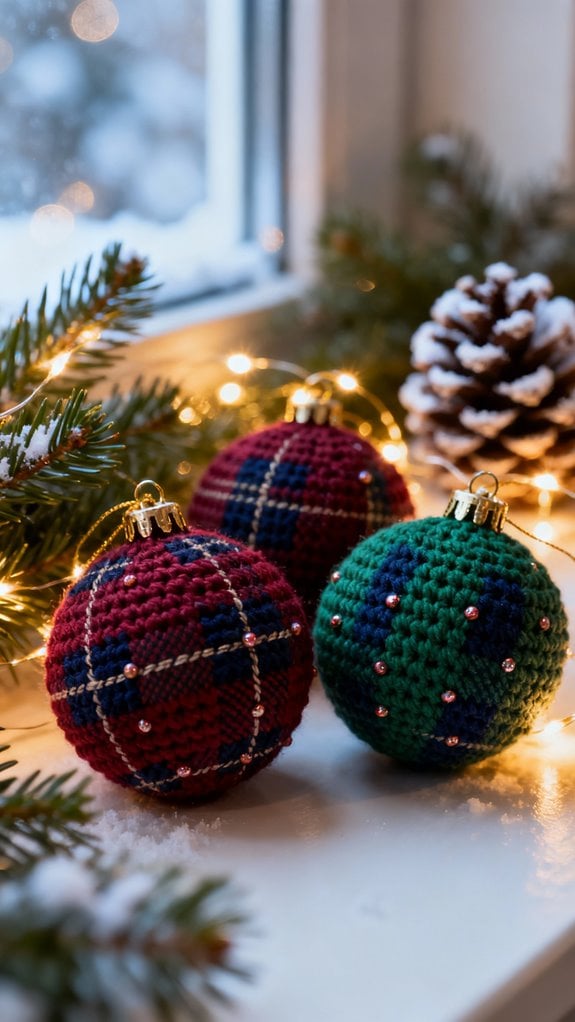
While tartan patterns might seem intimidating to recreate in crochet, I've discovered a clever technique that'll have you making gorgeous plaid baubles without the headache of complex colorwork. The secret? Surface crochet! You'll start by working your bauble in a solid base color, then add contrasting stripes using slip stitches across the surface. This method lets you create authentic-looking plaid without carrying multiple yarns simultaneously.
I recommend choosing traditional Christmas colors like red, green, and white for a classic look, or try unconventional combinations like navy and gold. The beauty of this technique is its forgiveness—if you're not satisfied with a stripe's placement, simply remove it and try again. These tartan ornaments add sophisticated Scottish charm to any tree. Look for this item on Amazon
Frosted Pinecone Bauble
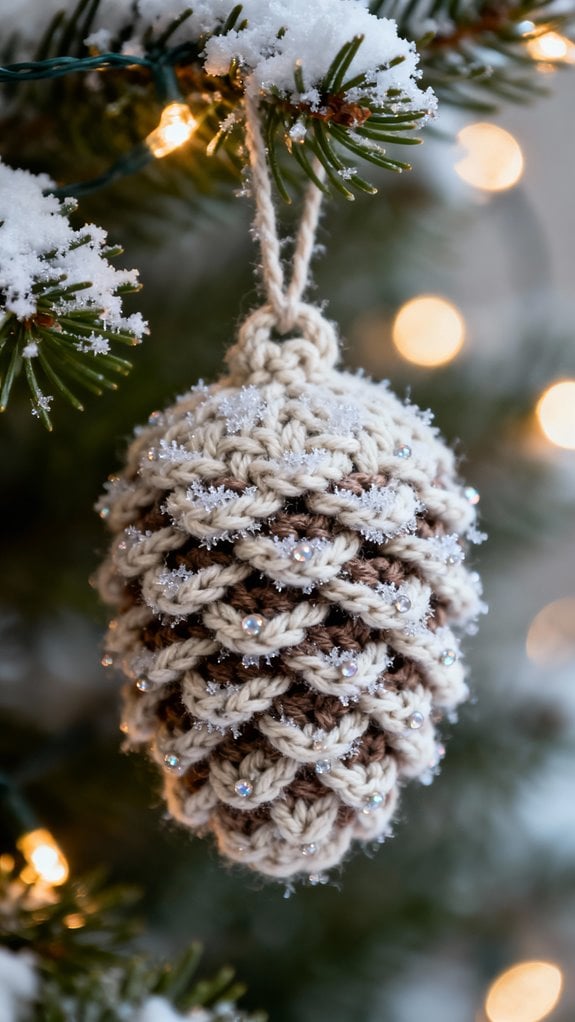
Nature's own ornament gets a cozy makeover when you transform it into crochet! I'm obsessed with how this frosted pinecone bauble captures winter's magic perfectly.
You'll work from the bottom up, creating overlapping scale-like stitches that mimic a real pinecone's texture. I recommend using brown or taupe yarn for the base, then switching to white or cream for those gorgeous frosted tips. The bobble stitch works beautifully here – it adds that essential dimensional quality that makes your pinecone look authentic.
Here's my favorite trick: brush the white sections with a wire brush after completing them. This creates a fluffy, snow-dusted effect that's absolutely stunning. Attach a ribbon loop at the top, and you've crafted something that looks plucked straight from a winter forest! Look for this item on Amazon
Sparkling Sequin-Studded Ornament
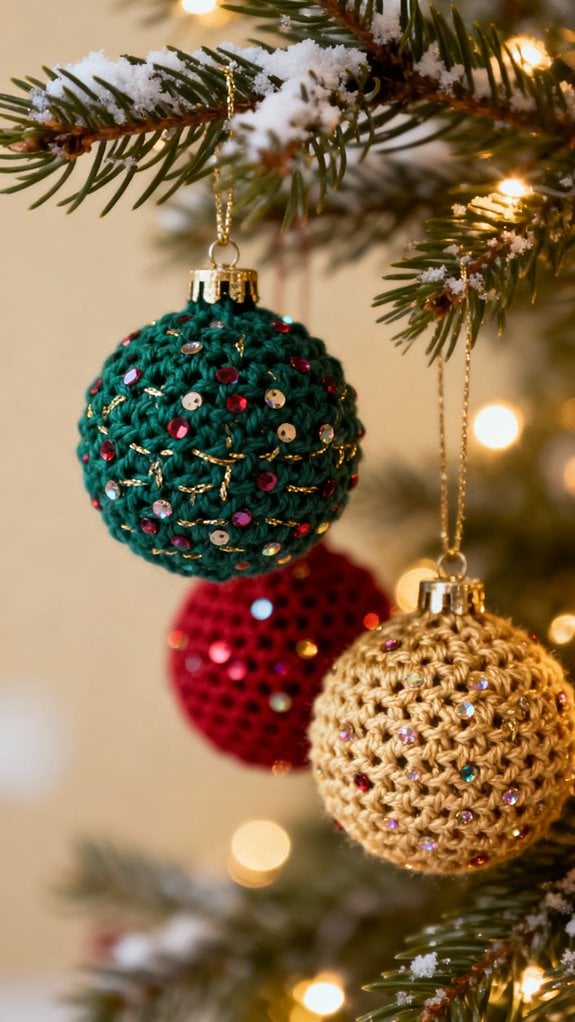
Glamour meets handmade charm when you add sequins to your crochet baubles! I'll show you how to create ornaments that catch and reflect light beautifully.
Start by threading sequins onto your yarn before crocheting. Work with a basic ball pattern, pushing sequins into position as you stitch. Place them strategically on every third or fourth stitch for even coverage, or cluster them densely for maximum sparkle.
Choose metallic yarn colors like silver, gold, or rose gold to amplify the glitzy effect. The sequins will naturally sit flat against your stitches, creating a professional finish.
For best results, use flat sequins rather than cupped ones—they'll lie smoothly against your work. You can also hand-sew additional sequins after completing your bauble for precise placement and extra dimension. Look for this item on Amazon
Miniature Stocking Bauble
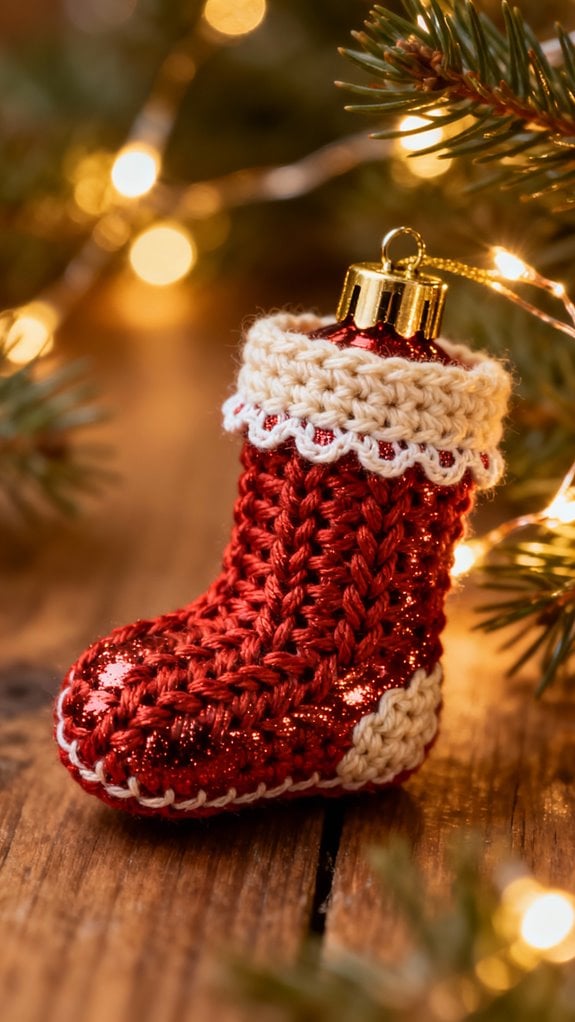
Nothing captures nostalgic Christmas magic quite like tiny stockings hung with care! I'm excited to show you how to create these adorable miniature stocking baubles that'll charm everyone.
Start with a simple rectangle in red or white yarn, then fold it to form the stocking shape. Add a contrasting cuff at the top using white fluffy yarn for that classic look. I recommend working in tight stitches to maintain the shape and prevent sagging.
Here's where you'll personalize: embellish with tiny buttons, bells, or embroidered snowflakes. Attach a hanging loop at the heel side for better balance on your tree.
These miniatures work up quickly—you can make several in one evening. They're perfect for gift tags or filling an entire tree with nostalgic charm! Look for this item on Amazon
Poinsettia Flower Medallion Ornament
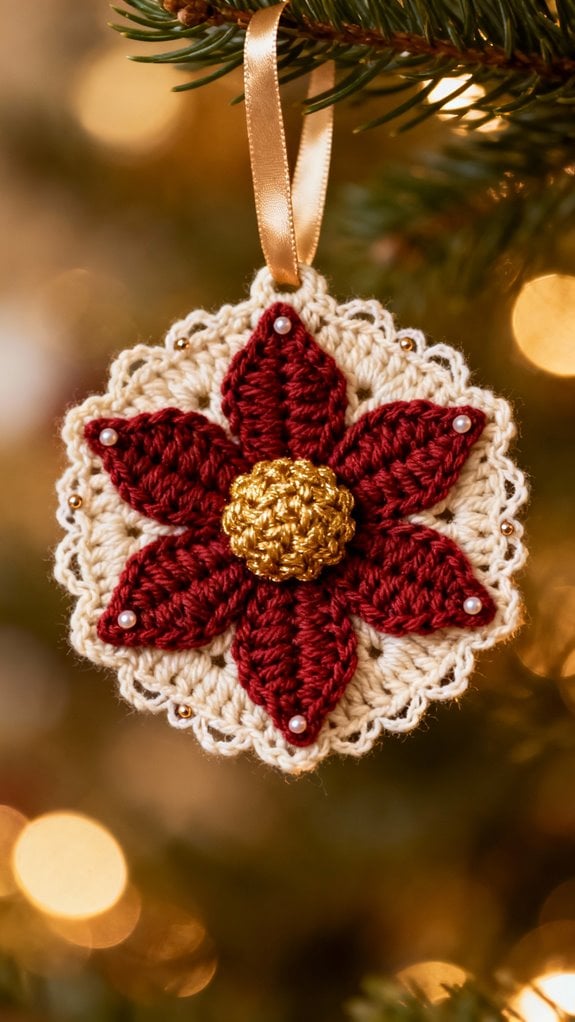
When December arrives, poinsettias become the undisputed stars of holiday décor, and you can capture their festive beauty in a crocheted medallion! I'll show you how to create layered petals using red yarn and strategic decreases that mimic the poinsettia's distinctive pointed leaves.
Start with a yellow center using French knots or popcorn stitches to represent the flower's natural clustered blooms. Then work your first petal layer in bright red, creating six to eight pointed leaves using double crochet decreases. Add a second layer slightly offset for dimension and depth.
The medallion lies flat, making it perfect for hanging on your tree or attaching to gift packages. You can even stiffen it with fabric stiffener for a more structured ornament that'll last for years. Look for this item on Amazon
Chunky Cable Knit-Style Bauble
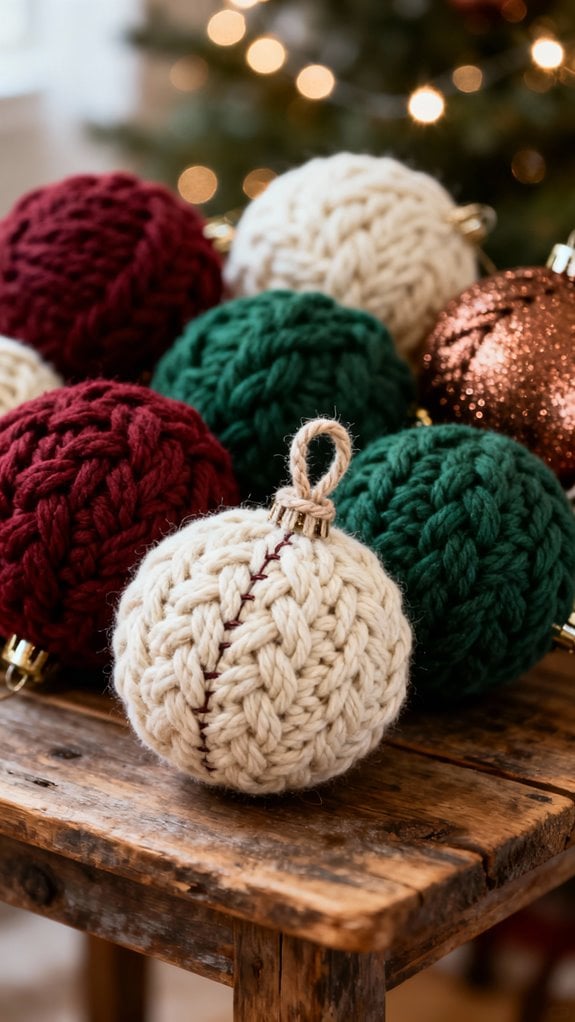
While flat medallions showcase intricate detail, sometimes you'll want a three-dimensional ornament with cozy texture that mimics your favorite winter sweater. This chunky cable knit-style bauble delivers that tactile appeal perfectly.
You'll create raised cable patterns using front post and back post double crochet stitches worked around a foam or plastic ball form. The technique sounds complex, but I promise it's just strategic stitch placement that creates those gorgeous twisted rope effects.
Start with a magic ring at the top, working increases to cover the widest part of your form, then decrease as you approach the bottom. The cables emerge naturally as you alternate post stitches in vertical columns. Choose cream, burgundy, or forest green yarn for that authentic Nordic sweater vibe that'll complement any tree beautifully. Look for this item on Amazon
Christmas Tree Motif Ornament
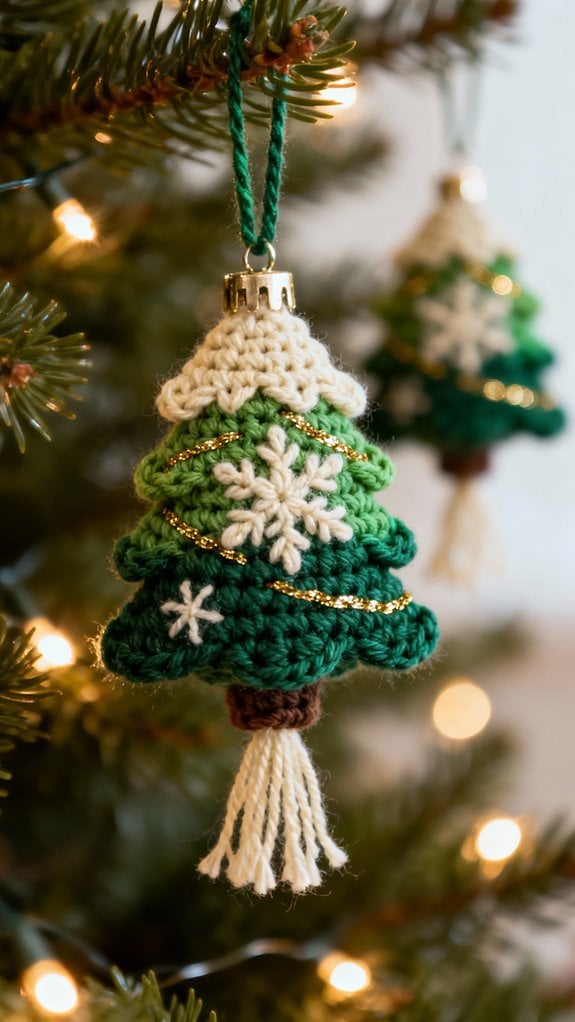
A perfectly shaped evergreen suspended from your tree branches creates that delightful meta moment every crafter loves. I'll guide you through creating this charming ornament using green worsted weight yarn and a simple tapestry technique.
Start with a magic ring and work in rounds, increasing strategically to form the classic triangle silhouette. You'll create the layered branch effect by switching between single and double crochets. Add texture with surface slip stitches that mimic pine needles cascading downward.
The trunk requires just brown yarn and a few tight rows. Embellish with tiny French knots in red and gold for ornaments, or leave it minimalist. I recommend stuffing lightly to maintain dimension without bulk.
Thread a ribbon through the top, and you've crafted an ornament that celebrates your passion perfectly. Look for this item on Amazon
Angel Wing Detailed Bauble
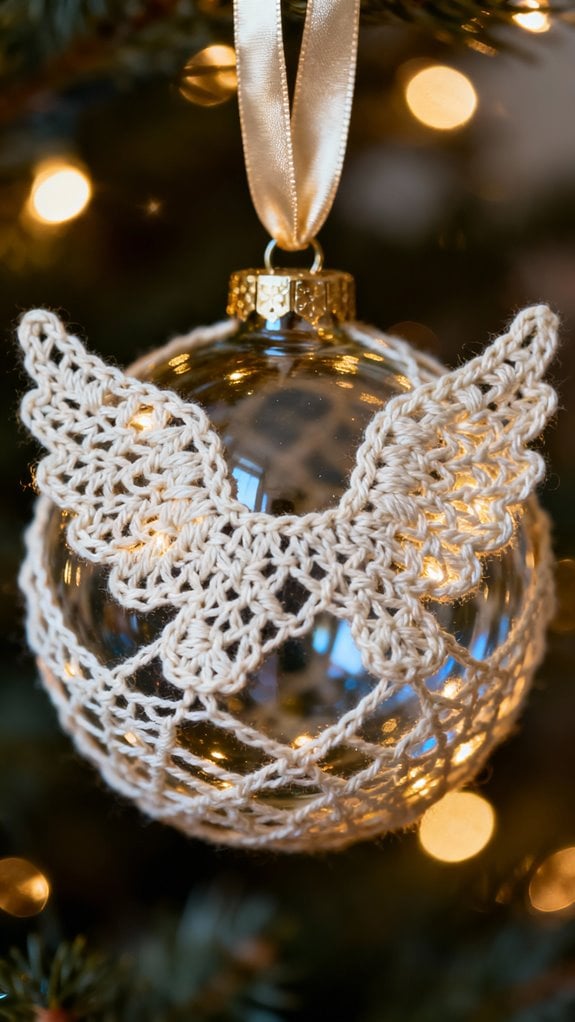
Moving from earthly evergreens to heavenly symbols, let's create wings that capture celestial grace in crochet form.
I'll guide you through crafting delicate angel wings that'll transform your bauble into something truly divine. Start with white or cream yarn in a lightweight weight for that ethereal quality.
Work each wing separately using a combination of chain spaces and double crochets to create the feathered texture. I recommend beginning at the wing's center and working outward, increasing strategically to form that graceful curve.
Here's my secret: add a subtle sparkle by threading metallic thread alongside your yarn. Position the finished wings on opposite sides of your bauble, securing them with invisible stitches.
The result? A breathtaking ornament that brings angelic beauty to your Christmas tree. Look for this item on Amazon
Vintage Button-Adorned Ornament

Nostalgia works magic when you pair handmade crochet with treasured buttons from your grandmother's sewing box. I'll show you how to transform a simple crocheted ball into a keepsake ornament that tells a story.
Start with a basic bauble in cream or ivory yarn. Now select 5-7 vintage buttons in varying sizes—think mother-of-pearl, antique brass, or delicate florals. Arrange them in a pleasing pattern before stitching them securely to your ornament's surface.
You can create clusters at the top, scatter them randomly, or form a vertical line down the center. I recommend using strong thread that matches your button colors. Add a satin ribbon loop for hanging.
These ornaments become conversation starters. Each button carries memories, making your tree uniquely personal and wonderfully meaningful. Look for this item on Amazon
Conclusion

I can't wait for you to plunge into these beautiful bauble designs! Each one offers something special—whether you're drawn to the classic elegance of red and gold stripes or the whimsical charm of peppermint swirls. Don't be afraid to experiment with colors and embellishments to make them uniquely yours. Grab your hook, choose your favorite pattern, and let's create some stunning ornaments that'll make your tree absolutely shine this holiday season!