15 Best Bolero Sewing Ideas You Need To Try!
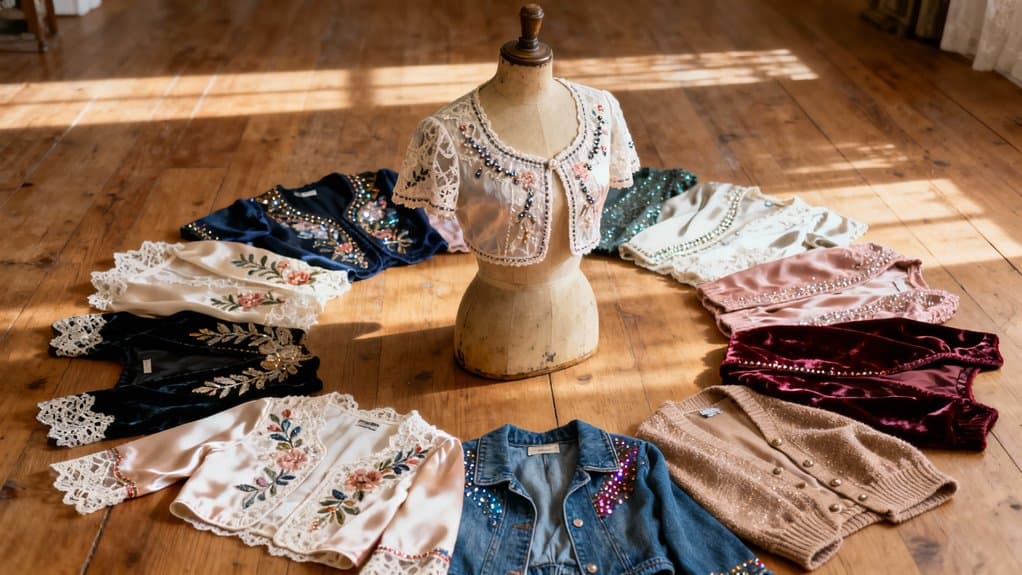
I’ve been sewing boleros for years, and they’ve become my go-to solution whenever an outfit needs that perfect finishing touch. Whether I’m dressing up a simple dress or adding warmth without bulk, these versatile little jackets never disappoint. What I love most is how quickly they come together—you can create something stunning in just an afternoon. Let me walk you through my fifteen favorite designs, starting with the ones I reach for most often.
Key Takeaways
- Classic cropped and structured brocade boleros offer versatile elegance using lightweight cotton, silk, or heavyweight fabrics with interfacing.
- Asymmetrical and cascading sleeve designs create modern, dramatic silhouettes using linen, crepe, chiffon, or organza fabrics.
- Simple shrug boleros with jersey fabric provide comfortable, quick projects completed in under an hour for casual layering.
- Lace-trimmed and sheer organza boleros elevate formalwear with French seams, delicate fabrics, and custom necklines for events.
- Fantasy-inspired hooded and elven-style boleros transform costumes using knit fleece, georgette, and modular sleeve construction techniques.
Classic Cropped Open-Front Bolero for Everyday Elegance

I’ve been sewing boleros for years, and the classic cropped open-front style remains my go-to pattern when I need versatile elegance that works from morning meetings to evening dinners. I typically start with lightweight cotton or silk—you’ll only need about a yard of fabric for most adult sizes. The construction begins by joining side panels and sleeve gussets, then attaching front and back pieces along the shoulder seams for stability. I always press at each stage; it’s essential for achieving clean seams around curved edges. For the finishing touch, I attach self-facing at the neckline and center front, creating that smooth professional look. If you’re working with a tie-front variation, consider adding front waist darts to create beautiful shaping that follows your natural curves. The beauty lies in its simplicity—this cropped silhouette sits perfectly at the waist, flattering every body type. Additionally, using lightweight fabrics can enhance the overall drape and comfort of your bolero, making it suitable for various seasons.
Asymmetrical Bolero With Modern Silhouette

The asymmetrical bolero has become my favorite pattern for clients who want something beyond traditional tailoring—there’s an artistic edge to it that transforms even simple jeans and a tee into something intentional. I typically recommend medium-weight fabrics like linen or crepe for structure, and always line it for that professional finish. This style can be enhanced with customization options that allow for personal expression through fabric choice and embellishments.
The front-short, back-long silhouette creates visual tension that’s surprisingly wearable. When cutting asymmetrical pieces, I’m meticulous about grainline alignment—it’s essential for the drape to work properly. The construction takes about four hours at an intermediate skill level.
What I love most is the versatility: leave it open for casual wear, add hook-and-eye closures for evenings, or adjust the hem lengths to customize the dramatic effect. The pattern is available in seven different sizes ranging from XS to XXXL, making it accessible for a wide range of body types. It’s genuinely transformative.
Lace-Trimmed Party Bolero for Special Occasions

When I first sewed a lace-trimmed bolero for my sister’s wedding, I discovered how a few yards of delicate fabric could completely elevate formalwear—and I’ve been hooked ever since.
I recommend starting with lightweight cotton or nylon lace featuring scalloped selvages—these edges become your built-in trim, eliminating waste while adding gorgeous detail. Before attaching lace, I always trim away seam allowances and test my applique technique on scraps. French seams work beautifully for enclosing raw edges in sheer fabric, ensuring a polished finish.
For special occasions like proms or cocktail parties, I customize necklines to complement strapless dresses and add delicate hook closures that won’t compete with the lace. Pin generously since lace shifts easily. Consider embellishing with beading or sequins for extra festivity. The cropped silhouette provides elegant shoulder coverage while showcasing your dress beneath. Always check lace stretch direction before cutting your pattern pieces to ensure the fabric drapes correctly across the shoulders and arms, and remember that lining choices can enhance the overall comfort and look of your bolero.
Simple Shrug Bolero With Long Sleeves

After countless attempts at fitting complicated jacket patterns, I finally discovered that long-sleeve shrug boleros offer all the coverage I need with a fraction of the fuss.
I start with stretchy jersey fabric—about 29–30 inches by 60 inches—and pre-shrink it to prevent future warping. I fold the fabric lengthwise, mark my arm span and desired sleeve width, then cut a simple rectangle. After overlocking the edges to prevent fraying, I sew the side seams from wrist to underarm using a zigzag stitch for flexibility. Sewing techniques like these ensure a professional finish and added durability.
The beauty lies in customization: I’ll add gathered cuffs for visual interest or shorten sleeves for warmer weather. This project takes under an hour and layers beautifully over dresses. Stretchy and flowing materials ensure the bolero drapes naturally and moves comfortably with your body. It’s perfect for repurposing leftover fabric while creating versatile, comfortable outerwear.
Hooded Bolero Shrug for Fantasy-Inspired Looks

Since I discovered hooded bolero shrugs at a Renaissance faire three years ago, I’ve sewn at least a dozen variations for cosplay events and everyday wear. These cropped garments transform simple outfits into magical ensembles instantly.
I recommend knit fleece blends (65% cotton, 35% polyester) for beginners—they’re forgiving and structured. Construct the hood separately, then attach it at the neckline. I always add three to five extra rows around hood edges for a fuller, finished appearance.
For sleeves, I prefer flare styles that create dramatic silhouettes. Attach them after shaping the bolero’s bottom edge.
The pattern complexity rates just 1/5, making this accessible even if you’re new to sewing. Multi-size digital patterns accommodate XXS to XXXL bodies. I’ve completed weekend projects that worked perfectly for fairy, witch, and steampunk costumes. Additionally, consider using cotton and flannel for a cozy and stylish finish that elevates your bolero’s comfort and aesthetic.
Beginner-Friendly Knit Fabric Bolero

I’ve sewn seven knit fabric boleros in the past year, and each one taught me that choosing the right material makes all the difference for beginners. I recommend jersey or cotton blends with good drape and stretch—they’re forgiving and comfortable to wear. Additionally, when selecting fabrics, consider lightweight wool or knits to enhance versatility and comfort in different seasons.
Start with a 29–30″ x 60″ piece of pre-washed fabric. Fold it lengthwise, right sides together, then mark your pattern with chalk. I cut with 1 cm seam allowances for easier adjustments. Sew shoulder seams first using a zigzag stitch, then tackle the sides before attaching sleeves.
For finishing, I fold edges under 1 cm and topstitch close to the edge. A zigzag stitch prevents unraveling while maintaining stretch. My fastest bolero took just 90 minutes—perfect for quick wardrobe updates! If you want to replicate a favorite bolero without taking it apart, you only need basic materials: paper, pin, and pencil to trace your pattern directly from the original garment.
Bridal Bolero With Delicate Lace Details

Last spring, I crafted my cousin’s bridal bolero using ivory Chantilly lace, and watching her walk down the aisle in something I’d made remains one of my proudest sewing moments. I started with Simplicity #9364, adapting the pattern for 3/4 sleeves with scalloped cuffs. Here’s what worked: I carefully harvested scalloped edging from fabric salvage, then zigzag-stitched it around the neckline and hem after trimming seam allowances completely. French seams kept underarm edges comfortable against her skin. The cropped, open-front design highlighted her strapless gown beautifully while adding modest coverage for the ceremony. I tested everything on scraps first—alignment matters with scalloped edges. The entire project took about 45 minutes of focused sewing. Use invisible thread for seamless results, and you’ll create an heirloom-worthy piece. Incorporating functional details like snap closures can elevate your bolero design even further.
Cascading Sleeve Bolero for Dramatic Flair

The first time I draped chiffon from a bolero sleeve and watched it flutter with every movement, I understood why cascading sleeves command attention on runways and red carpets alike. I recommend lightweight fabrics like organza or georgette—they create that ethereal floating effect without weighing down your shoulders. Here’s what I’ve learned: reinforce those shoulder seams with twill tape before attaching sleeves, or they’ll stretch over time. For dramatic volume, I gather my ruffle strips closely; for subtler elegance, I space them wider. Start with a fitted, cropped bodice using precise darts, then build your cascading layers using rolled hems for clean edges. Essential techniques like collar and cuff construction can elevate your bolero’s overall look. Test arm movement during fitting—you want drama, not restriction. If you’re planning a renaissance fair shrug, you’ll need approximately 2.5 yards of shell fabric for those dramatic cascading sleeves. The result? Pure statement-making magic.
Hip-Length Bolero Jacket for Versatile Layering

After years of creating cropped boleros that barely grazed my ribs, I finally drafted a hip-length version and discovered what I’d been missing—true wardrobe versatility. This jacket works over everything from sleeveless dresses to high-waisted skirts, adding sophistication without bulk.
I start with my semi-fitted bodice block, drafting the neckline 3.5 to 4 inches deep. You’ll close waist darts partially for shaping, then extend the length to your hip measurement. I’ve made versions in linen for spring layering and wool for fall changes.
Construction’s straightforward: join shoulder seams, bind the neckline with bias strips, and finish armholes neatly. The hip-length cut naturally accentuates your waistline while providing coverage. Always trim seam allowance after stitching to reduce bulk and create clean lines. Try embellishing yours with decorative buttons or embroidery to elevate casual fabrics into evening-appropriate pieces.
Sheer Organza Bolero for Summer Elegance

While hip-length boleros excel at structure and coverage, I’ve found summer months call for something dramatically different—a sheer organza bolero that barely whispers against your skin. I created mine for a garden wedding last June, and it transformed my simple slip dress into something ethereal.
Start with organza in pastels or neutrals—I chose blush pink. You’ll need sharp 70/10 needles and fine polyester thread to prevent snagging. Draft a basic pattern measuring your bust, waist, and shoulders, ending at your natural waist. I added balloon sleeves for drama without heat.
Use French seams to hide fraying edges, and finish with narrow hems. Press gently with low heat and a cloth. The transparency beautifully showcases whatever you’re wearing underneath while adding elegant coverage. For a polished finish, complete the hem with an invisible stitch for a clean look that maintains the delicate aesthetic.
Structured Brocade Bolero for Statement Style

When I decided to sew my first structured brocade bolero last fall, I underestimated how dramatically it would elevate my entire wardrobe—suddenly, every plain sheath dress and pencil skirt became runway-worthy. Brocade’s heavyweight fabric creates sculptural lines that hold their shape beautifully, though I learned quickly to use sharp scissors and finish edges carefully since it frays easily. I spent about four hours on construction, using fusible interfacing at the collar and shoulders for extra crispness. The lined interior made all the difference in comfort and structure. For those seeking theatrical drama, a ruffled standing collar adds an elegant historical touch that works beautifully for costume productions or Renaissance faire events. Now I reach for this piece constantly—it transforms simple outfits into statement looks for galas and formal events. The defined shoulders and cropped length create perfect proportions when paired with high-waisted trousers.
Peplum Bolero for Theatrical Costumes

Structured boleros command attention at formal events, but peplum boleros bring pure theatrical magic to the stage. I’ve sewn these for three community theater productions, and they transform performers instantly.
Start with layered tulle or organdy to create that signature flared peplum. I recommend incorporating stretch velvet or spandex in the bodice—dancers need unrestricted movement. Add lace appliqué or beaded embellishments for visual impact under stage lights.
For construction, prioritize open-front designs with adjustable closures. I’ve learned lightweight fabrics prevent overheating during performances. Consider adding shoulder accents like fringe or sheer mesh drapes.
My favorite touch? Detachable elements for quick changes backstage. Bold color contrasts—think fuchsia-black or gold-blue—photograph beautifully. Whether you’re costuming a Ravel-inspired ballet or Renaissance fair, this theatrical piece delivers unforgettable drama. Fashion design students often work directly with dancers for fittings to refine their costume designs throughout the creative process.
Rib Knit Bolero With Custom Sleeve Variations

I’ve knit seven rib knit boleros over the past two years, and they’ve become my go-to gift for friends who want effortless layering pieces. The 4-way stretch of rib knit creates a body-hugging fit while maintaining excellent drape. I prefer rayon or bamboo blends for breathability.
My favorite technique involves starting bottom-up with ribbed cuffs, then switching to larger needles and increasing stitches for volume. I’ve created puff, bell, and balloon sleeves using the same base pattern by adjusting row counts and adding M1R increases post-cuff. For dramatic statement sleeves, I lengthen ribbing to 20 rows. You can shift length from sleeves to cuffs to achieve a better fit while maintaining the overall proportions of the design.
I always work from graded patterns (XS to 5XL) and check gauge carefully—10 stitches by 16 rows per 4 inches guarantees accurate sizing. Blocking after assembly transforms the finished piece.
Elven-Style Cosplay Bolero With Flowing Details

After falling down a Lord of the Rings cosplay rabbit hole last spring, I discovered that elven-style boleros transform any costume into something otherworldly—and they’re surprisingly straightforward to sew.
I grabbed a digital PDF pattern offering XXS–XXXL sizing and printed it at my local copy shop in A0 format. For flowing movement, I chose georgette for the waterfall sleeves and cotton twill for the bodice—you’ll need about 1.75 yards total.
Here’s my key advice: measure carefully if you’re working with Asian sizing, and always toile first with cheap fabric. The georgette was slippery, so I used extra pins and sharp scissors. French seams kept my edges clean, and I added metallic embroidery along the cuffs for that magical touch. The modular sleeve construction let me customize the dramatic pointed ends perfectly. The pattern includes a step-by-step tutorial with detailed illustrations that made the intermediate-level construction much easier to follow.
Raw Silk Bolero Jacket for Sophisticated Events

While cosplay projects let me explore fantasy aesthetics, I’ve found that mastering a raw silk bolero jacket opens up an entirely different wardrobe domain—one where I can confidently walk into weddings, gallery openings, and evening galas. I draft mine from a semi-fitted dress block, then add waist darts for precise shaping over formal dresses. Raw silk’s subtle sheen elevates the entire look without appearing flashy, and its breathability keeps me comfortable during long receptions. I widen the collar to 4.5 cm at the back for framing my face, and I always underline with silk organza to preserve structure. When creating the collar, I extend the collar edge length by 0.5-0.7 cm at each side of the front style seam to ensure proper fit and drape. Covered buttons and piping add custom touches that align with event themes, transforming a simple bolero into a sophisticated statement piece.
Conclusion
I’ve spent years experimenting with bolero designs, and I can tell you—each one transforms an outfit in unexpected ways. Start with a simple shrug if you’re new to garment construction; I made my first one in an afternoon! Don’t worry about perfection. Choose fabrics you love, take your time with the sleeves, and remember that every stitch builds your confidence. You’ll be amazed at what you create!

Keep reading
20 Latest Crochet Neck Warmer Ideas To Try In 2025!
Link up with the 20 best crochet neck warmers that blend warmth and style—discover which designs will transform your winter wardrobe!
20 Amazing Crochet Jewelry Ideas
Amazing crochet jewelry ideas await you, featuring unique designs that will inspire your creativity and elevate your accessory game to new heights.

20 Amazing Crochet Kit Ideas
Navigate through 20 amazing crochet kit ideas that spark creativity and joy; discover the perfect project to ignite your crafting passion!
Need personal guidance?
Talk to an advisor
Our care experts are here to help you make the right choice — for free.