15 Best Baggy Pants Sewing Ideas You Need To Try!
I’ll be honest—I used to avoid sewing pants altogether until I discovered how forgiving baggy styles can be. There’s something liberating about creating pants that prioritize comfort without sacrificing style, and trust me, once you’ve made your first pair, you’ll wonder why you ever bought them off the rack. I’ve gathered 15 of my favorite baggy pants projects that’ll transform how you think about your handmade wardrobe, starting with the easiest patterns first.
Key Takeaways
- Classic oversized sweatpants use heavy cotton jersey with 45% stretch and elastane for shape retention and comfortable drape.
- High-waisted pleated trousers in linen or wool gabardine create leg-lengthening effects with reinforced pleats and back darts.
- Drop-crotch harem pants feature a lowered crotch line and adjustable drawstring waist for relaxed, customizable styling.
- Cargo baggy pants allow creative pocket placement with sturdy canvas or nylon, plus options for Velcro and D-rings.
- Wide-leg denim jeans transform with contrasting triangular panels inserted through inseams for enhanced width and visual interest.
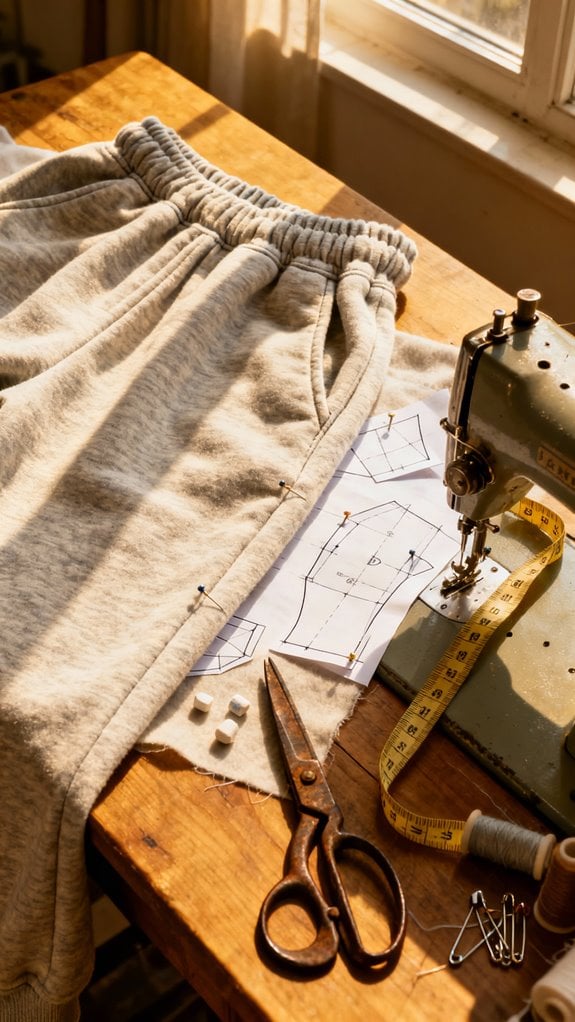
Classic Oversized Cotton Sweatpants With Elastic Cuffs
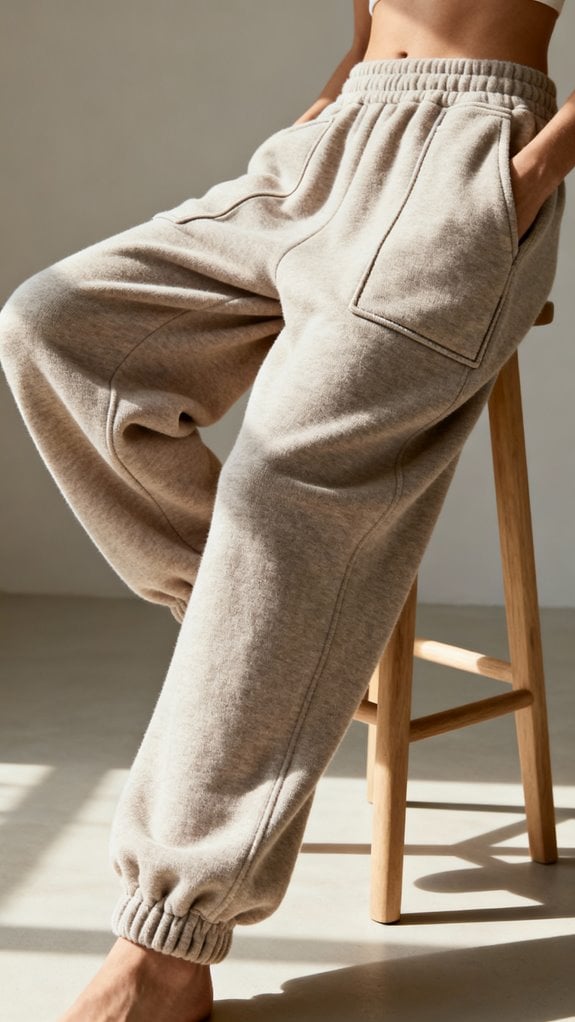
There’s something wonderfully satisfying about slipping into a pair of handmade sweatpants that actually fit the way you want them to. I’ve found that using heavy cotton jersey with about 45% stretch creates that perfect slouchy drape while maintaining structure. The key is cutting generous measurements through the hips and legs, then tapering toward the ankle for a clean cuff.
I always add 8–10% elastane to my cotton blend for shape retention—trust me, it prevents that dreaded bagginess after multiple wears. For the elastic cuffs, I measure around my ankle with a 1.5 cm overlap and use the four-quadrant marking system to distribute gathers evenly. Additionally, incorporating decorative seams can enhance both the visual appeal and durability of your sweatpants. The waistband elastic should be 10–20% shorter than your waist measurement for comfortable stretch without slipping. When selecting thread, opt for 3-ply polyester thread since it provides the durability needed for garments that will see frequent wear and washing.
High-Waisted Pleated Baggy Trousers for Versatile Styling

While sweatpants are perfect for lounging, I’ve discovered that high-waisted pleated baggy trousers offer all that comfort with enough polish to wear just about anywhere. I love how the pleats add structure while creating a leg-lengthening effect, and that high waistband? It’s incredibly flattering.
I typically sew mine in linen for summer or wool gabardine for cooler months, as these fabrics provide both comfort and style. The construction involves reinforced pleats sewn about 2 5/8 inches before curving, back darts for shaping, and a standard fly-front zipper. I always finish my waistband using “stitch in the ditch” for that invisible, professional look.
What makes these trousers special is their versatility. I’ll pair them with a crisp button-down for work, then switch to a simple tee for weekend errands—same pants, completely different vibe. For an even more relaxed feel, try rolling up the hem like the linen styles from Na Nin, which gives a casual, lived-in look perfect for warmer weather. Additionally, you can explore wide-leg silhouettes that enhance the overall comfort while maintaining a chic appearance.
Drop-Crotch Harem Pants With Adjustable Drawstring Waist

I’ll admit, the first time I saw drop-crotch harem pants, I thought they looked a bit odd—until I sewed my first pair and discovered how incredibly comfortable they are. The secret is drafting a pattern with the crotch line 4–5 inches lower than standard pants, which creates that signature relaxed silhouette. Additionally, incorporating functional details like pockets can enhance their practicality.
I start with a rectangle about 44 inches wide, then add a casing at the waist for the adjustable drawstring. This lets you customize the fit perfectly. I always reinforce the buttonholes where the cord exits—trust me, it prevents annoying fraying later.
Choose lightweight fabrics like cotton or rayon for maximum flow and breathability. The construction is surprisingly simple: sew the leg seams, join at the crotch, attach the waistband, and hem. Don’t forget to curve the center bottom line for a more natural fit in the crotch area.
Cargo Baggy Pants With Multiple Utility Pockets

When I started sewing cargo baggy pants last year, I underestimated how addictive pocket placement could be—suddenly I was sketching designs at breakfast and repositioning patch pockets in my head during my commute. The beauty of making your own cargo pants is you control exactly where pockets go based on what you actually carry. I always add oversized patch pockets on the thighs and hidden zipper compartments at the knees—perfect for my phone and keys. In addition, you can incorporate organizational pockets to keep all your essentials neatly arranged.
I recommend using sturdy cotton canvas or nylon blends with reinforced stitching at stress points. The baggy silhouette gives you room to experiment with asymmetric pocket layouts without compromising comfort. Try adding Velcro patches or D-ring attachments for customization. These pants pair perfectly with everything from sneakers to boots, making them incredibly versatile for daily wear. For a complete street-style outfit, consider teaming them with graphic hoodies and utility vests for that fashionable yet functional aesthetic.
Wide-Leg Denim Baggy Jeans With Contrasting Panels

After years of staring at my favorite vintage Levi’s wondering how to give them new life, I discovered that adding contrasting panels transforms standard jeans into statement wide-leg pieces without requiring advanced sewing skills.
I simply seam-ripped the inseam, cut triangular panels from donor denim, and pinned them right sides together before sewing. The key is measuring carefully—I typically add 4–8 inches per side at the hem, plus seam allowance. Matching the panel length to your ripped opening (usually 28–29 inches) prevents lopsided results.
What excites me most is the design freedom. I’ve used lighter denim for subtle flare and even experimented with vintage towels for bold texture. Inner seam panels create understated width, while outer placement makes a pronounced statement. Adding embellishments like embroidery can elevate your design even further, making your baggy jeans truly unique.
Elasticated Waistband Loungewear Pants for Ultimate Comfort

Wide-leg statement jeans are thrilling, but some days I just want pants I can nap in—which is exactly why I’ve sewn more elasticated waistband loungewear than I’d like to admit.
I press my waistband edge down by 1/4″, then again by 1″, creating a casing for 3/4″ elastic. Here’s my trick: cut elastic 2-4 inches shorter than your waist measurement for that perfect, secure-but-not-suffocating fit. Thread it through with a safety pin, making absolutely sure it doesn’t twist. For added comfort, consider choosing suitable fabrics like breathable cotton or jersey—your skin will thank you during marathon Netflix sessions. I always pre-shrink everything and use quality braided elastic for longevity. Add topstitching along the waistband edge to keep everything stable through countless washes. Before you start cutting, remember to pay attention to the straight of grain so your fabric stretches properly and your pants hang correctly. Trust me, these become your most-worn garments.
Baggy Cargo Pants With Rope Accent Details

I position my cargo pockets at the outer thigh, splitting their 10-inch width evenly across the side seam for perfect symmetry. The flaps secure my essentials while sturdy topstitching handles all the stress. I always use durable fabrics like cotton twill or Ankara—they hold their baggy shape beautifully.
For the rope accent, I create a channel in my 2.5-inch waistband after inserting the elastic, adding a buttonhole at center front for the drawstring exit. I typically use 1.5 yards of rope in a contrast color, finishing the ends with decorative knots. This adjustable detail elevates the entire design while maintaining that relaxed, comfortable fit I love. Additionally, using durable fabrics ensures that my pants can withstand everyday wear and tear without losing their shape.
Twill Fabric Baggy Pants With Reinforced Seams

Choosing the right fabric transforms baggy pants from sloppy to stylish, and that’s exactly why I reach for twill every time. Its diagonal weave creates durability that withstands daily wear while naturally hiding dirt marks—perfect for pants you’ll actually live in. Additionally, fabric selection plays a crucial role in achieving the desired fit and style for your baggy pants.
I always cut my pattern with generous seam allowances (1″ for side seams, 0.5″ for inseams) and finish every edge with overlocking to prevent fraying. Then I topstitch along all major seams for that professional, reinforced look. The back pieces get cut 2–3″ wider than the front, creating authentic bagginess without sacrificing shape.
My favorite detail? Double-fold hems with two rows of topstitching. They anchor the wide legs beautifully and survive countless washes. Stretch twill variants add mobility while maintaining that crisp appearance. The fabric’s natural wrinkle resistance means your baggy pants maintain their structure throughout the day without constant ironing.
Color-Blocked Baggy Pants With Toggle Cuff Adjustments

When I discovered color-blocking on baggy pants, it completely changed how I thought about casual sewing projects. I started by drawing design lines directly onto my pattern—straight lines work best for beginners, though curved blocking adds serious visual interest. The key is adding seam allowances to every cut edge where colors meet.
I cut each piece on a single layer to maintain accuracy, then overlapped edges before sewing. Pressing seams toward the darker panels and topstitching gave my pants that professional streetwear look. I used color markings and numbers to keep all my pattern pieces organized throughout the assembly process.
Adding toggle cuffs transformed functionality. I created simple fabric channels at the hem, inserted drawcords with plastic cord locks, and suddenly had adjustable leg openings. This feature adapts to different shoes and weather perfectly. Pre-washing my contrasting fabrics prevented any color-bleeding disasters later.
Viscose Flow Baggy Pants With Deep Side Pockets

Viscose changed everything about how I approach baggy pants—its silk-like drape creates this effortless flow that cotton just can’t match. I learned quickly that deep side pockets need reinforcement since viscose weakens at stress points. I line my pockets with interfacing to prevent sagging and tearing.
Pre-washing is non-negotiable. I shrunk my first pair after completion—devastating mistake I won’t repeat. When cutting, I use a rotary cutter on a large flat surface because viscose shifts constantly. My needle of choice? An 80/12 universal, sharp enough to glide through without snagging.
The elastic waist complements the flowy silhouette perfectly. These pants move beautifully with every step, giving that bohemian elegance I absolutely love. The excellent moisture absorption makes them comfortable in both warm and cool weather. Just remember: low iron temperature with a damp cloth barrier.
Streetwear-Inspired Baggy Pants With Custom Embroidery

Streetwear embroidery transformed my baggy pants from basic sewing projects into wearable art. I’ve learned that proper prep makes all the difference—washing the fabric first prevents puckering, and using magnetic hoops with tear-away stabilizer keeps everything crisp.
My favorite technique? Opening the outer seam on pant legs to embroider large motifs flat, then reseaming for that professional finish. I’ve experimented with 3D foam effects and geometric illusions on the thigh, creating statement pieces that rival retail brands.
For thick denim, I rely on a #90/14 sharp needle and polyester thread. The key is avoiding over-embroidering—too much density stiffens the fabric and kills that baggy drape. I always test designs on scrap fabric first. Asymmetrical placement on one leg adds that fashion-forward edge I’m after. When it’s time to clean my embroidered pieces, I hand wash in cold water with the pants turned inside out to preserve the stitching.
Crepe Fabric Relaxed-Fit Pants With Shirred Waistband

Crepe fabric has become my secret weapon for sewing relaxed-fit pants that feel like pajamas but look polished enough for brunch. The lightweight, drapey texture creates that effortless flow I love, while staying wrinkle-resistant through hours of wear.
I always prewash my crepe to avoid any surprises with shrinkage. The shirred waistband is where the magic happens—I wind elastic thread onto my bobbin and sew parallel rows across the waistband for a snug, adjustable fit that flatters different body shapes.
My go-to tips: use a fine-point needle to prevent snags, cut single layers with weights to stop shifting, and always press seams with a cloth on the wrong side. A walking foot keeps everything feeding evenly on this slippery fabric. For finishing the hem and inner seams, I run a zigzag stitch along raw edges to prevent the fabric from fraying over time.
Convertible Baggy Pants With Adjustable Leg Ties

I’ve sewn five pairs of convertible pants this year, and they’ve completely changed how I pack for trips. The zip-off sections at the knee let me switch between pants and shorts instantly, which is perfect for hiking when temperatures shift.
I recommend top-stitching around zippers to keep hems flat and prevent puckering. The adjustable leg ties are game-changers—I thread them through casings at the ankles to customize the fit for boots or barefoot wear.
Start with precise measurements for your waist, hip, and crotch depth. I use lightweight cotton or linen since they’re breathable and easy to move in. The mirrored pattern pieces guarantee both legs match perfectly. These pants accommodate different body types beautifully, and I love that damaged sections can be replaced without scrapping the whole garment.
Beginner-Friendly Basic Baggy Sweatpants Pattern
While convertible pants offer versatility for adventurous sewers, a basic baggy sweatpants pattern is where I tell every beginner to start their sewing journey.
I love this pattern because it uses just 2–3 simple pieces and forgiving materials like sweatshirt fleece that won’t curl or frustrate you. You’ll need 1.5–2 yards of fabric and basic elastic for the waist and ankles.
Here’s my approach: skip the pockets initially. Sew your crotch seams first, then outseams, inseams, and finally add elastic casings at the waist and ankles. Your standard sewing machine’s zigzag stitch works perfectly—no serger needed.
The loose fit means small measuring mistakes won’t ruin your project. I’ve completed these in under two hours, and they’re incredibly satisfying for newcomers wanting immediate, wearable results. For fabric selection, stick with polyester/cotton blend options or ponte knit for the easiest handling with stretch.
Fashion-Forward Baggy Pants With Oversized Cargo Pockets

Oversized cargo pockets transformed my plain baggy pants into statement pieces that consistently earn compliments from strangers. I learned to create three-dimensional pocket construction using box pleats, which gives incredible depth and storage capacity. The key technique involves layered assembly—attaching flap closures with snaps or Velcro before topstitching the pleated pocket bodies onto the thigh area.
I prefer medium-weight cotton twill or stretch blends that maintain structure while allowing that coveted baggy drape. For my first pair, I used contrasting mesh on the pocket flaps, which amplified that Y2K streetwear vibe. Double-fold hems and edge stitching at stress points guarantee durability. These pockets actually hold my phone, wallet, and keys without losing shape. The patterns accommodate various sewing skill levels, making these cargo pants achievable whether you’re a beginner or advanced sewist. Pair them with cropped tops for maximum urban edge.
Conclusion
I’ve fallen in love with sewing baggy pants – they’re honestly the most forgiving projects I’ve tackled! Whether you’re drawn to those cozy sweatpants or edgy cargo styles, there’s something here for every skill level. I remember my first pair had wonky cuffs, but I wore them proudly anyway. Don’t overthink it; just pick a pattern that excites you and start cutting fabric. You’ll be rocking your handmade pants before you know it!
